


Repair
34 309292S
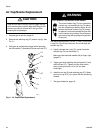
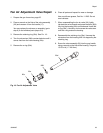
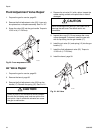
Fluid Adjustment Valve Repair
1. Prepare the gun for service, page 25.
2. Remove the fluid adjustment valve (25). It can only
be replaced as a complete assembly. See F
IG. 20..
3. Screw the valve (25) into the gun handle. Torque to
15-25 in-lb (1.7-2.8 N•m).
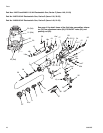
Fig. 20. Fluid Adjustment Valve
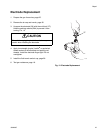
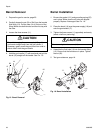
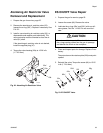
Air Valve Repair
1. Prepare the gun for service, page 25.
2. Remove the barrel, page 30.
3. Remove the fluid adjustment valve (25) from the
handle (17). Remove the spring (15). See FIG. 21..
4. Remove the air valve (21) with a pliers. Inspect the
rubber sealing surface and replace the air valve if
damaged.
5. Inspect the u-cup (6*). Do not remove the u-cup
unless damaged. If removed, install the new one
with its lips facing into the gun handle (17).
6. Install the air valve (21) and spring (15) into the gun
handle (17).
7. Install the fluid adjustment valve (25). Torque to
15-25 in-lb (1.7-2.8 N•m).
8. Install the barrel, page 30.
Fig. 21. Air Valve
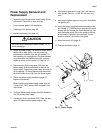
CAUTION
Clean all parts in non-conductive solvent compati-
ble with the fluid being used, such as xylol or min-
eral spirits. Use of conductive solvents can cause
the gun to malfunction.
ti1507a
25
CAUTION
When removing the air valve (21) be careful not to
damage the seat area.The rubber seal is not
removable.
ti1512a
25
15
21
*6
17