


Model H7757 3" Mini Wool Buffer -13-
To remove/mount a wheel:
1. DISCONNECT THE MACHINE FROM
THE POWER SUPPLY!
2. Remove the three Phillips head screws
and tooth washers that go through the
outer guard, and take off the outer
guard.
3. Use a wrench on the nut that holds
the wheel on the arbor. Hold the wheel
from turning with your other hand.
Note: The left end of the arbor has a
left-handed thread, so loosening the
nut will require turning it clockwise.
4. Remove the outer wheel flange and
paper disc. Pull the wheel free from
the arbor. There will also be a paper
disc and a wheel flange on the back
side of the wheel which should also be
removed.
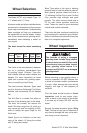
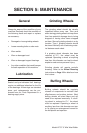
5. Mount the new wheel in the reverse
order that you removed it or as shown
in Figure 8. Always make certain there
are paper or fiber discs between the
wheel flanges and the wheel itself.
Tighten the nut snugly but DO NOT
over-tighten. Over-tightening can crack
a grinding wheel.
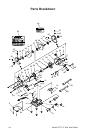
Replacing Wheels
The wheel guard assembly must be
removed in order to mount or dismount a
buffing or grinding wheel.
Figure 8. Wheel mounting order.
Flange
Hex Nut
Wheel
Paper/Fiber Disc
Paper/Fiber Disc
Flange
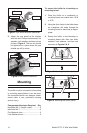
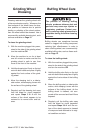
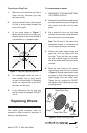
To perform a Ring Test
:
1. Make sure the wheel that you test is
clean and dry; otherwise, you may
get false results.
2. Hang the wheel in the air with a piece
of cord or string looped through the
hole in the center.
3. At the spots shown in Figure 7,
gently tap the wheel with a light non-
metallic device such as the handle of
a screwdriver or a wooden mallet.
4. An undamaged wheel will emit a
clear metallic ring or “ping” sound
in each of these spots. A damaged
wheel will respond with a dull thud
that has no clear tone.
5. If you determine from the ring test
that the wheel is damaged, DO NOT
use it!
Figure 7. Ring test tapping locations.