


-14- G5963 Surface Grinder
The wheel and sleeve assembly should be bal-
anced before mounting onto the Grinder.
Generally the wheel itself will be balanced by the
manufacturer. The Wheel Sleeve has Balance
Weights positioned in a groove which can be
moved to accomplish final balance of the assem-
bly.
1. Mount the wheel on the sleeve assembly
as described in the Wheel Mounting sec-
tion. Position the weights so they are even-
ly spaced around the groove.
2. Mount the wheel on the Balance Arbor,
which has a taper the same as that on the
machine spindle. Tighten the nut on the
arbor to lock the wheel in place.
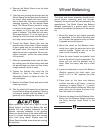
3. Place the arbor across two parallel, level
bars so the wheel is freely suspended. The
wheel will turn until the heaviest side is
down. Mark the heavy side with a chalk
mark.
4. Loosen the setscrew on one of the Balance
Weights opposite the chalk mark, and
move it so it is 180˚ opposite the chalk
mark.
5. Place back on the bars and observe
whether one side is still heavy. It may be
necessary to repeat Steps 3 - 5 several
times until the wheel is balanced. When the
arbor does not roll across the bars at all,
then the wheel is in balance.
6. Remove the wheel from the Balance Arbor.
Make sure the Balance Weight setscrews
are firmly secured. Install wheel in the
grinder.
Make certain the wheel has a tight fit on the
Wheel Sleeve, and that the Sleeve Nut and
Spindle Nut are properly tightened on the
Spindle. Improper assembly of the grinding
wheel can cause failure of the wheel which can
result in a wheel breaking apart and causing
injury from flying debris. Always have the
Wheel Guard installed, even when test running
the machine.
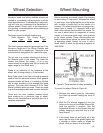
4. Remove the Wheel Sleeve from the back
side of the wheel.
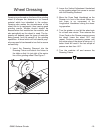
5. Take the new grinding wheel and insert the
Wheel Sleeve into the bore from the back of
the wheel. Most wheels will have a paper
disc on each side, this helps to equalize the
clamping pressure. Do not remove these
discs! The Wheel Sleeve should fit snugly
in the bore of the wheel. If it is too loose, do
not attempt to fill the gap with any other
types of material. The wheel will not main-
tain proper balance. If it is too tight, do not
attempt to force the wheel onto the Sleeve,
as it may cause cracking of the wheel.
6. Thread the Wheel Sleeve Nut onto the
opposite side of the wheel. Tighten enough
to get a good seat on the sleeves against
the paper discs, this helps to assure the
wheel will not slip in operation. Do not over-
tighten, however, as this can cause stress
on the wheel.
7. Slide this assembled wheel onto the spin-
dle, making sure the wheel sleeve hole and
the spindle taper are clean and free of any
foreign material, dents or nicks.
8. Tighten the Spindle Nut using the Pin
Wrench to hold the Sleeve and the
Adjustable Wrench to tighten the Nut. Do
not overtighten.
9. Replace the Wheel Guard and secure with
three cap screws.
10. Run the wheel at full speed for at least one
minute before doing any grinding. If there is
a structural problem with the wheel, it will
generally occur during the initial runup.
Wheel Balancing