


-32-
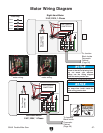
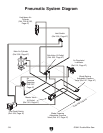
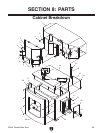
G0641 Double Miter Saw
Motor & Electrical (continued)
Symptom Possible Cause Possible Solution
Machine has vibra-
tion or noisy opera
-
tion.
1. Motor or component is loose.
2. Blade is at fault.
3. V-belts worn or loose.
4. Pulley is loose.
5. Motor mount loose/broken.
6. Machine is incorrectly mounted or sits
unevenly.
7. Arbor pulley is loose.
8. Motor fan is rubbing on fan cover.
9. Arbor bearings are at fault.
10. Motor bearings are at fault.
1. Inspect/replace stripped or damaged
bolts/nuts, and re-tighten with thread locking fluid.
2. Tighten arbor bolt; replace warped, bent, or twisted
blade; resharpen dull blade.
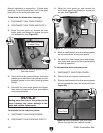
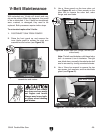
3. Inspect/replace V-belts with a new matched set
(Page 29).
4. Re-align/replace shaft, pulley, setscrew, and key as
required.
5. Tighten/replace.
6. Tighten/replace anchor studs in floor; relocate/shim
machine.
7. Re-tighten/replace arbor pulley with shaft and thread
locking liquid.
8. Replace dented fan cover; replace loose/damaged
fan.
9. Replace arbor housing bearings; replace arbor.
10. Test by rotating shaft; rotational grinding/loose shaft
requires bearing replacement.
Miter Saw Operations
Symptom Possible Cause Possible Solution
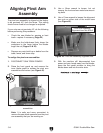
Blade is not aligned
with table miter slot.
1. Blade is warped.
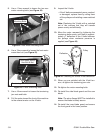
2. Pivot arm assembly out of alignment.
1. Replace blade.
2. Adjust pivot arm assembly 45° to fence (
Page 34).
Machine slows when
operating.
1. Applying too much pressure to workpiece.
2. V-belts loose or worn.
1. Reduce blade lowering speed (
Page 20).
2. Re-tension/replace V-belts (
Page 29).
Excessive vibration. 1. Loose arbor nut.
2. Blade out of balance.
3. Arbor bearings worn.
1. Tighten the arbor bolt.
2. Replace blade.
3. Replace arbor bearings.
Board binds or burns
cuts.
1. Blade is warped.
2. Dull blade.
3. Feed rate too slow.
1. Replace blade.
2. Sharpen/replace blade.
3. Increase blade lowering/raising speed (
Page 20)
Workpiece moves
during cutting.
1. Hold-downs are not properly adjusted.
2. Blades begin cut before hold-downs clamp
workpiece.
1. Properly adjust hold-downs to workpiece (
Page 19).
2. Adjust lowering speeds so that hold-downs clamp
workpiece before blades begin the cut (
Page 20).
Cuts are not 45°. 1. Blade is warped.
2. Pivot arm assembly out of alignment.
1. Replace blade.
2. Adjust pivot arm assembly 45° with fence (
Page
34).
Excessive or unac
-
ceptable tear out.
1. Incorrect blade being used.
2. Dull blade.
3. Bakelite inserts or aluminum block in table
have been cut larger excessively larger than
blade kerf.
4. Blade lowering/raising speeds incorrect for
workpiece material.
1. Use 12" blades that are designed for miter cutting of
wood products that typically have a high tooth count
and a #6 tooth set.
2. Sharpen/replace blade.
3. Replace bakelite inserts (Part No. 135 & 135) or
aluminum block (Part No. 134) (see
Page 41).
4. Adjust blade lowering/raising speeds while mak
-
ing test cuts on scrap piece of same material to be
used for production run, using trial-and-error adjust
-
ments.