


-42-
G0555X (Mfg. Since 1/12)
Wheel alignment is one of the easiest ways to
ensure you get optimal performance from your
bandsaw. When wheels are aligned, or coplanar,
the bandsaw is more likely to cut straight without
wandering; and vibration, heat, and blade wear
are considerably decreased because the blade
is automatically balanced on the wheel. This is
known as “Coplanar Tracking."
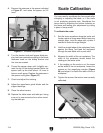
To verify if the upper and lower wheels are
coplanar:
1. DISCONNECT BANDSAW FROM POWER!
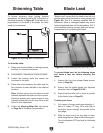
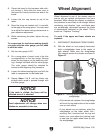
2. With the blade on and properly tensioned,
hold a straightedge close to the center of
both wheels. Make sure the straightedge
fully extends across the wheels as shown in
Figure 47.
— If the wheels are coplanar, the straightedge
will touch the top and bottom of the outside
rims on each wheel.
— If your wheels are not coplanar, place the
straightedge on the lower wheel first—
ensuring that it touches both the top and
bottom rim—and adjust the tracking knob
to see how the upper wheel lines up with
the straightedge.
Figure 47. Checking wheel alignment with a
straightedge.
NOTICE
Lead adjustments will change when new
blades are mounted on the saw.
NOTICE
If the table is shifted, the fence will be
affected since it is attached.
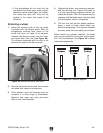
3. Clamp the board to the bandsaw table with-
out moving it. Now slide the fence over to
the board so it barely touches one end of the
board.
4. Loosen the four cap screws on top of the
fence.
5. Skew the fence as needed until it is parallel
to the edge of the scrap piece. You may need
to re-adjust the fence locking mechanisms to
gain maximum adjustment.
6. While maintaining the skew, tighten the cap
screws.
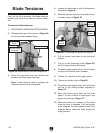
To compensate for lead when making straight
crosscuts with the miter gauge, you will need
to shift the table:
1. Set the miter gauge to 90°.
2. On a scrap piece of wood, mark a line that
is perpendicular to the front edge. Starting
where the line begins, cut the board by push-
ing it through the blade with the miter gauge.
The miter gauge should be checked for
square before beginning this procedure.
3. Loosen the table mounting bolts, and shift the
table to compensate for the blade lead.
4. Repeat Steps 1 & 2 until the blade cuts
straight when wood is pushed through with
the miter gauge.
Wheel Alignment