


-16-
G0663 12½" Planer
• Inspect your lumber for twisting or cupping,
and surface one face on a jointer if neces
-
sary.
• Scrape off all glue when planing glued-up
panels.
• DO NOT plane more than one piece at a
time.
• Never remove more than the recommended
amount of material on each pass. Remove
less material on each pass when planing
wide or dense stock.
• Support the workpiece on both ends. Get
assistance if you are planing long lumber, or
use roller stands to support the workpiece.
• Measure the workpiece thickness with cali-
pers to get exact results.
• Carefully inspect all stock to make sure it is
free of large knots or foreign objects that may
damage your knives, cause kickback or eject
from the planer.
• When possible, plane equal amounts on
each side of the board to reduce the chance
of twisting or cupping.
• Use the entire width of the planer to wear
knives evenly.
• Always plane WITH the grain direction of the
wood. Never plain cross-grain or end-grain.
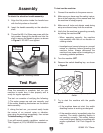
Planing Tips
Note: Any time you switch directions with the
cutterhead elevation handle, there will be a
small amount of backlash—so the first crank
of the handle after switching directions will
be slightly less than
1
⁄16". However, as long
as you move the handle in the same direc
-
tion during operation, backlash will not be a
factor.
4. Turn the elevation handle ¼ turn clockwise to
raise the cutterhead approximately
1
⁄64". This
will set the depth of cut to
1
⁄32". Remove the
workpiece from the planer.
5. Turn the planer ON.
6. With the flat side of the board down on the
table, feed the workpiece into the front of the
planer, making sure not to stand directly in
front or behind the workpiece to reduce the
risk of a kickback injury.
—If the cut is too deep and bogs down the
planer, turn the planer
OFF immediately,
allow it to come to a complete stop, raise
the cutterhead, remove the workpiece,
reduce the depth of cut, then repeat
Step
6.
Note:
The infeed and outfeed rollers will
control the feed rate of the workpiece as it
passes through the planer. Do not push or
pull on the workpiece.
7. Once the workpiece is clear of the outfeed
roller, measure the workpiece thickness. If fur
-
ther planing is needed, lower the cutterhead
by turning the elevation handle
½ turn (
1
⁄32"),
return the workpiece to the infeed table, then
continue.
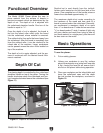
8. Continue this process until the desired
thickness is reached. The depth of cut indi
-
cator scale shows the approximate thickness
of the workpiece after it has been cut. Use
this indicator to judge when the thickness
is approximately correct. For more precise
applications, use a caliper to measure the
workpiece thickness.