


-22-
G0663 12½" Planer
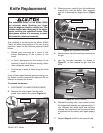
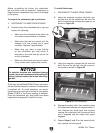
To install the knives:
1. DISCONNECT PLANER FROM POWER!
2. Using the magnets, position the knife over
the two pins on the cutterhead. Be sure the
knife is oriented with the beveled edge up, as
shown in
Figure 22.
Figure 22. Knife installation.
Before re-installing the knives, the cutterhead,
gib and knife must be inspected. Neglecting to
inspect these components may result in damage
to the planer.
To inspect the cutterhead, gib, and knives:
1. DISCONNECT PLANER FROM POWER!
2. Carefully clean the cutterhead with a rag and
inspect the following:
• Make sure the threaded screw holes do
not contain wood material or sawdust.
• Make sure that the hex socket and the
threads of all hex screws are in good
condition. Replace if questionable.
• Make sure any resin or glue buildup
on the cutterhead, gib, and knives is
removed so the knife and gib will sit flat
on the cutterhead.
• Make sure the knives are free of cracks.
If any cracks e
xist, replace both knives.
To maintain accurate and consistent planing
results, we do not recommend sharpening the
knives. Instead, replace the knives when they
get dull.
The knives on the Model G0663 Planer are revers
-
ible and should always be reversed or replaced as
a matched set. To avoid downtime, we recom
-
mend having an extra set of knives for your planer
(Model T20413 in the Grizzly catalog or website).
Once the cutterhead, gib, and knives have been
inspected and prepared, install the knives.
Pins
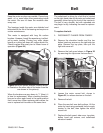
3. Using the magnets, replace the gib over the
knife. Secure the gib with the six screws in
the locations shown in
Figure 23.
Figure 23. Gib installation.
4. Depress the safety latch, then carefully rotate
the cutterhead towards you approximately ¼
turn. Release the safety latch and continue
rotating the cutterhead until the second knife
slot is exposed and the safety latch again
engages.
5. Repeat Steps 2 and 3 for the second knife,
then replace the knife guard.
Beveled Edge Up