


- 8 - Hunters Meat Cutting
Bandsaw
7. If the stand is wobbly, check your floor
first. If the floor is level, loosen the bolts
and wiggle the stand until it rests firmly on
the floor. Re-tighten the bolts.
C. Bandsaw Unit
1. Lift the bandsaw onto the stand. The front
of the saw must be on the same side as
the switch.
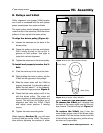
2. Attach the bandsaw to the stand with the
three (3) threaded studs. Screw them up
through the stand top and into the welded
nuts on the base of the bandsaw. Figure
3. It may be necessary to shift the band-
saw slightly to get the studs lined up right.
3. Feed the short electrical cord through the
plastic wire clamp in the motor junction
box. Connect the wire according to the
wire diagram insert included with this
manual. Tighten the wire clamp. DO
NOT over-tighten – the plastic threads
may strip.
4. The longer cord from the base of the saw
is the power cord. It is prefitted with a
110V grounded plug. NEVER
REMOVE THE GROUNDING
PRONG!
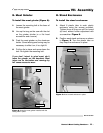
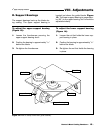
VII. Assembly
Figure 3 shows the stud mounting locations.
Threaded Stud
5. Install the rubber feet. They should go
through the 90° brackets first and then
through the sides. Tighten securely.
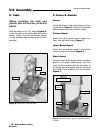
B. Motor
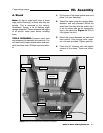
1. Secure the auxiliary motor bracket to the
stand top. Use carriage bolts, nuts, and
washers. Figure 2.
2. Fasten the primary motor bracket to the
left brace and the auxiliary motor bracket.
Use carriage bolts, nuts, and washers.
Do not fully tighten.
3. Mount the motor to the primary motor
bracket using the hex bolts, nuts, and
washers provided. Do not fully tighten.
4. Press the motor pulley over the motor
shaft and insert the key in the keyway.
Position the pulley so its V-groove is
roughly centered over the rectangular
slot in the stand top. Tolerances are tight:
you may need to sand the key or the key-
ways slightly. Tighten the setscrew.
5. Now that the motor is mounted, tighten all
the stand bolts but leave the motor bolts
loose.
6. Flip the stand/motor assembly right side
up on the floor. Hold the motor so it does
not slide when you tip the stand over.
Welded Nuts
2
nd
page of 5 page section