


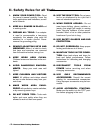


VII. Assembly
Hunter’s Meat Cutting Bandsaw - 9 -
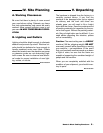
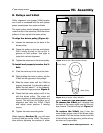
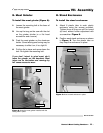
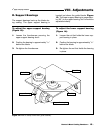
1"
Driven Pulley
Motor Pulley
Figure 4 shows the V-Belt installed correctly.
D. Pulleys and V-Belt
Pulley alignment and proper V-Belt tension
are crucial to increased belt life and optimal
power transmission from motor to blade.
The motor pulley should already be centered
under the slot in the stand top. Shift the driven
pulley so it lines up with the motor pulley.
To align the driven pulley (Figure 4):
1. Loosen the setscrew on the back of the
driven pulley.
2. Grasp the pulley on the top and bottom.
Shift it along its shaft to line up the V-
grooves on both pulleys. Use sight to
judge their vertical alignment.
3. Tighten the setscrew on the driven pulley.
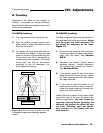
To install and properly tension the V-
Belt:
1. Push the motor up to the top of its slots.
2. While holding the motor in place, slip the
V-Belt into the grooves in the pulleys.
3. Slide the motor down until the V-Belt is
properly tensioned. You should be able to
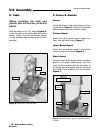
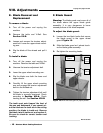
deflect the belt about 1" at the midpoint.
Use moderate finger pressure. Figure 5.
4. Check that the motor pulley is still in line
with the driven pulley. The motor will
have a tendency to twist slightly when it is
moved. This will push the pulleys out of
alignment and twist the V-Belt. Check
and adjust motor position if twisting
occurs.
5. Tighten the motor mounting bolts.
When cleaning (Section XI), you will need
to take off and put on the V-Belt. This can be
done without adjusting the position of either
pulley. UNPLUG THE MACHINE FIRST!
To remove the V-Belt, pull it laterally from
the back of the motor pulley and roll the pul-
leys forward. The belt will pop off. Figure 4.
To replace the V-Belt, loop it over the
motor pulley and as much of the driven pulley
as possible. Roll the pulleys forward and the
V-belt will slip into the grooves, just like a bicy-
cle chain on its sprockets.
Figure 5 shows proper V-Belt deflection.
Driven Pulley
V-Belt
Pull Here to
Remove
3
rd
page of 5 page section