


-12- G8749 Drum/Flap Sander
SECTION 6: MAINTENANCE
The Flap/Drum Sander is ruggedly constructed to
provide years of dependable service. To ensure
that you enjoy maximum performance and
longevity, we suggest the following routine main-
tenance:
1. Check all fasteners for tightness before
each use. Tighten when necessary.
2. Keep the Sander clean for maximum effi-
ciency and heat dissipation. Wipe away
accumulated sanding dust and grime after
each use.
3. Inspect sanding sleeves for excessive wear
and damage. Replace if necessary.
4. Inspect the switch and cord periodically for
wear or damage. Replace if necessary.
5. Bearings are sealed and permanently lubri-
cated, so no further lubrication is needed.
Check for wear periodically and replace
when worn. Increased motor noise and
vibration are both indicators of bearing
wear.
General
DO NOT make adjustments or attempt any
maintenance procedures while this
machine is running. Ensure that the switch
is off, power is disconnected and all mov-
ing parts have stopped before making
adjustments. Failure to do so could result
in serious operator injury.
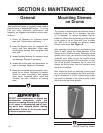
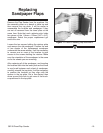
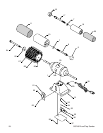
Mounting Sleeves
on Drums
The Sander is supplied with two different sizes of
inflatable drums, one 4
3
⁄4" in diameter, the other
3
1
⁄2" in diameter. To remove the sleeve, first de-
inflate the rubber drum by pressing on the plunger
in the center of the air valve with a nail or paper
clip. With a bit of coaxing the abrasive sleeve
should come loose.
See Figure 10.
After selecting the desired grit and backing type
(hard or soft), check the inside diameter of the
sleeve for the direction arrows. Determine which
spindle, left or right, you intend to install the drum
assembly onto. Make certain the rotation of the
abrasive sleeve agrees with the direction of rota-
tion of the spindle. Remember the air valve will
always be facing away from the machine when
the drum is installed.
Now inflate the drum by attaching a hand pump
(e.g. as bicycle tire pump) to the valve and inflat-
ing to a maximum of 10 PSI. Pressure any higher
can result in damage to the drum’s seals. Install
the drum onto the motor spindle.
Figure 10. Installing sanding sleeve.