


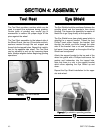

G9717 6" Grinder
-9-
WWhheeeell MMoouunnttiinngg
Before mounting any wheel, check it for integrity
by performing a “ring check”. Balance the wheel
on one finger, then lightly tap the rim of the wheel
with a piece of wood such as the handle of a
hammer. The wheel should have a ringing or
harmonic type of sound. If it responds with a dull
thud it may indicate that the wheel has cracks. Do
not use a wheel which is suspected of having
cracks, or if there are visual chips, nicks or dents
in the wheel surface. These discontinuities can
lead to wheel failure where the wheel flies apart
at operating speed. Always be sure to use a
wheel which is rated for operating at speeds
equal to or greater than 3450 RPM.
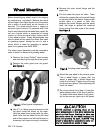
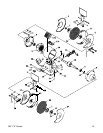
The wheel guard assembly must be removed in
order to mount or dismount a grinding wheel.
11
. Remove the three Phillips
®
head screws
and nuts which go through the outer guard.
22..
Remove the outer guard and rim guard.
SSeeee FFiigguurree 44..
FFiigguurree 44..
Wheel guard components.
FFiigguurree 55..
Grinding wheel assembly.
NNEEVVEERR aasssseemmbbllee aa ggrriinnddiinngg wwhheeeell oonn tthhee
aarrbboorr wwiitthhoouutt ppaappeerr oorr ffiibbeerr ddiissccss bbeettwweeeenn tthhee
wwhheeeell aanndd tthhee ffllaannggee.. OOmmiittttiinngg tthhee ddiissccss ccaann
ppuutt uunndduuee ssttrreessss oonn tthhee wwhheeeell ccaauussiinngg iitt ttoo
ccrraacckk aanndd ppoossssiibbllyy ffllyy aappaarrtt.. AALLWWAAYYSS ““rriinngg
cchheecckk”” aa wwhheeeell bbeeffoorree aasssseemmbbllyy ttoo mmaakkee cceerr--
ttaaiinn iitt iiss ssoouunndd wwiitthh nnoo ccrraacckkss oorr ffllaawwss..
33..
Use a
3
⁄4" or 19mm open end wrench on the
nut which holds the wheel on the arbor.
Hold the wheel from turning with the other
hand. Note that the wheel on the left hand
side of the machine is a left hand thread, so
loosening it will require turning it clockwise.
44
. Remove the outer wheel flange and the
paper disc.
55..
Pull the wheel free from the arbor. There
will also be a paper disc and a wheel flange
on the back side of the wheel. Always make
certain there is a paper or fiber disc
between the wheel flanges and the wheel
itself, this helps to spread the rotational
forces across the inner area of the wheel.
SSeeee FFiigguurree 55..
66..
Mount the new wheel in the reverse order.
First a wheel flange, a paper disc, the
wheel, a paper disc, a wheel flange and
finally the nut itself. Tighten the nut snugly
but do not over tighten. Over tightening can
crack the wheel.
77..
Run a new wheel for at least 1-2 minutes
while standing clear of the line of rotation.
If a wheel does have defects it will gener-
ally fail as soon as it gets up to full speed
.