


-14- Shop Fox
®
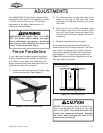
Classic Fence
Correcting Mounting
Hole Misalignment
If the front and back mounting holes do not line
up with the existing holes in the table top, it
will be necessary to drill additional holes using
one of the three following methods. Drilling
and tapping holes into the edge of the table,
drilling through the edge of the table and
securing the rail with long bolts, washers, and
nuts, or drilling holes in the rail that align with
the holes in the table top.
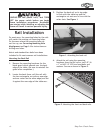
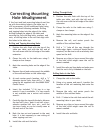
Drilling and Tapping Mounting Holes
1. Position the rails flush with the top of the
table saw table, and with the left end of
the rails even with the left edge of the table
extension.
2. Clamp the rails to the table saw using C-
clamps or bar clamps.
3. Mark the mounting holes on the edge of the
table.
4. Remove the rail and center punch the middle
of the outlined holes on the table edge.
5. At each center punch location, drill a
1
⁄8"
diameter starter hole, then drill a
5
⁄16" hole
using the bit supplied with the SHOP FOX
®
Classic Fence.
6. Insert the included
3
⁄8"-16 tap in a tap
wrench if one is available. If a tap wrench
is not available use a socket and ratchet
wrench.
7. Carefully align the tap with the hole. Advance
the tap half a turn, back it out half a turn,
advance another half turn, etc., until the
tap turns freely or can be visually seen at
the exit end of the hole.
8. Back the tap out and proceed to the next
hole. It is not necessary to use cutting oil
when tapping cast iron.
9. Install the rails and the bolts.
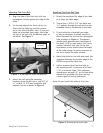
Drilling Through-Holes
1. Position the rails flush with the top of the
table saw table, and with the left end of
the rails even with the left edge of the table
extension.
2. Clamp the rails to the table saw using C-
clamps or bar clamps.
3. Mark the mounting holes on the edge of the
table.
4. Remove the rail, and center punch the
middle of the outlined holes.
5. Drill a
7
⁄16" hole all the way through the
table edge. Again, cutting oil should not be
required, but be sure to use a relatively slow
speed on the drill.
6. Remove any chips or burrs around the edge
of the hole which might cause the rail to
mount crooked.
7. Install the rails and long bolts and make sure
that the nut is fully threaded on the bolt.
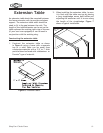
Drilling Holes In the Rails
1. Clamp the rails to the table.
2. Using a try square and pencil, transfer the
location of the rail mounting hole onto the
rails.
3. Remove the rails, and center punch the
middle of the outlined holes.
4. Drill
1
⁄2" holes in the rails that match the rail
mounting holes in your table.
5. Remove any chips or burrs around the edge
of the hole which might cause the rail to
mount crooked.
6. Install the rails and bolts.