


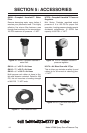

Model H7668 Spray Gun w/Pressure Cup-12-
6. Set the pressure control knob to regu-
late the fluid pressure to the gun.
Please follow material manufacturer's
recommendations for this setting.
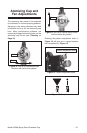
7. Adjust the atomizing cap to vertical or
horizontal. See Atomizing Cap and
Fan Adjustments on Page 13 for fur-
ther explanation.
8. Trial and error are necessary to achieve
the results you want along with a fair
amount of practice. Test your material
flow and spray pattern on a piece of
cardboard or some scrap of material
similar to your project.
9. Adjust the fluid control knob to start
with a low volume of material and keep
the atomization as low as possible.
You will need to use a combination of
fluid control, inlet air pressure, air flow
control and stroke speed to achieve the
results you want. Spray so the material
wets out nicely without running or sag-
ging.
10. Use the pattern control knob to adjust
the spray fan to your desired pattern.
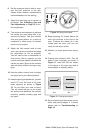
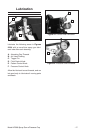
11. Keep the gun tip perpendicular, parallel
and 8-10" from the work at all times
when spraying as shown in Figure
10. Do not allow your wrist to bend.
This will cause the gun to arc across
the surface and distribute the material
unevenly, possibly creating sags and
dry spots.
12. Begin spraying 2-3 inches before the
work and continue to the end of the
work. Continue the motion for a few
inches past the work until you are
ready for the return stroke.
13. Maintain an even speed when spray-
ing.
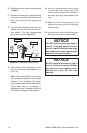
14. Overlap each stroke by 50%. This will
ensure even coverage as shown in
Figure 11. Less than 50% as shown
in the figure to the right may lead to
missed spots or streaky results.
Figure 10. Spray technique.
Figure 11. Overlap technique.
15. Spray stroke should have even consis-
tency and parallel edges. If it doesn't
please refer to Troubleshooting on
Page 18.
No
Yes