


-20-
Model T26417/T26418 (Mfd. Since 11/13)
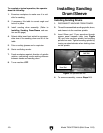
Installing Sanding
Drum / Sleeve
1. DISCONNECT MACHINE FROM POWER.
2. Thread the assembled sanding spindle, drum,
and sleeve into the machine spindle.
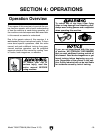
3. Insert 22mm and 17mm wrenches through
access panel beneath table (see Figure
13) and onto machine spindle and sanding
spindle hex nuts. Tighten sanding spindle by
turning counterclockwise when looking down
on the spindle.
4. To remove assembly, reverse Steps 2–3.
Figure 13. Spindle hex nut.
Installing Sanding Drums
Sanding Spindle
Hex Nut
Machine Spindle
Hex Nut
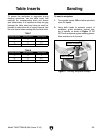
To complete a typical operation, the operator
does the following:
1. Examines workpiece to make sure it is suit-
able for sanding.
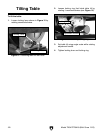
2. If necessary, tilts table to correct angle and
locks it in place.
3. Install sanding drum assembly. (Refer to
Installing Sanding Drum/Sleeve sub-sec-
tion on this page.)
4. Selects table insert best suited to accommo-
date size of the sanding drum and tilt of the
table.
5. Puts on safety glasses and a respirator.
6. Starts oscillating sander.
7. Feeds workpiece against direction of spindle
rotation, maintaining a safe working distance
between hands and sanding drum.
8. Turns machine OFF.