


Page 10 For technical questions, please call 1-800-444-3353. Item 38142
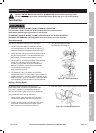
Changing Drill Speed
Before changing the speeds, make sure the
machine is switched OFF and UNPLUGGED.
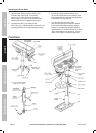
1. Open the pulley cover.
2. Slacken off the Belt Tension Lock Knobs (18A)
on both sides of the head and turn the
Belt Tension Lever (19A) clockwise, to bring the
Motor Pulley (11A) closer to the Spindle Pulley (3)
in order to remove all tension from the drive belts.
3. Consult the chart inside the pulley cover and position
the belts on the pulley’s according to the spindle
which corresponds to the spindle/drill speed required.
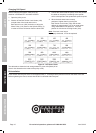
4. When the belts have been correctly
positioned, tighten them by turning the
Belt Tension Lock Knobs (18A) until the belt
deflects by approximately 1/2″ at its center when
using reasonable thumb pressure. Lock this
position in with the two Locking Knobs (18A).
Note: If the belt is too long to
be properly tensioned, it must be replaced.
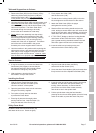
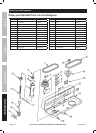
Figure C: Drill Speed Table
The table above shows the belt arrangements for given drill speeds (A full
chart is also located on the inside of the pulley cover).
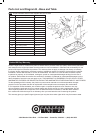
Bit Installation
Insert the drill into the jaws of the chuck approximately 1″, ensuring that the jaws do not touch the flutes of the drill.
Before tightening the chuck, ensure that the drill is centered within the jaws.
SAFETY OPERATION MAINTENANCESETUP