


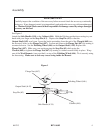
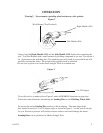

Assembly
See Figure 1
Attach the Side Handle (#34) to the Cabinet (#16). Hold the Polisher upside down resting in your
hand with your finger on the Stop Pin (# 3) . Depress the Stop Pin (# 3) so that the
Output Shaft (#42) won’t turn. Insert the knobs protruding from the end of the Wrench (#49) into
the recessed holes on the Flange Nut (#47). Loosen and remove the Flange Nut (#47) by turning it
counterclockwise. Set the Polishing Wheel (#46) on the Output Shaft ( #42). Replace the
Flange Nut (#47). Make sure you are depressing the Stop Pin (#3) while using the
Wrench (#49) to tighten the Flange Nut (#47) by turning it clockwise until firmly in place. Wrap
one of the Wool Bonnets ( two provided ) on top of the Polishing Wheel (#46). Tie it securely using
the drawstring. Make sure to tuck any excess string inside the Bonnet.
#41213 4
Figure 1
IMPORTANT
Carefully inspect the condition of the accessory before use and check the accessory continually
during use. If any damage is noted, stop immediately and replace the accessory with an undamaged
one. Harbor Freight Tools cannot be held responsible for damage caused by using a damaged
accessory on this tool.
REV 06/05
Polishing Wheel (#46 )
Flange Nut (# 47)
Stop Pin (#3)
Output Shaft (# 42)
Cabinet (#16)
Side Handle (# 34)