


Page 5SKU 44846
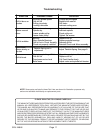
8. When finished with the Drill Press, always press the Switch to the OFF position.
9. Do not mount (or adjust) the workpiece on the Drill Press Table while the motor is
running.
10. When drilling or cutting large holes, use the slower speeds and securely fasten the
workpiece to the table using a mounted vise.
11. Do not use drill bits that extend more than six inches from the Chuck.
12. Do not use circle cutters, rotary planers, wire wheels, router bits, or shaper cutters on
this Drill Press.
Unpacking
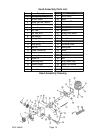
When unpacking, check that all parts are included. Refer to the Parts Lists and Assembly
Drawings located at the end of this manual. If any parts are missing or broken, please call
Harbor Freight Tools at the number on the cover of this manual as soon as possible.
Assembly
Assembly hardware is located in one box and one bag. Each contains the necessary parts
for each assembly step. Remove all packing and protective material from the Drill Press
components. To aid in assembly, refer to the Assembly Drawings at the end of this manual.
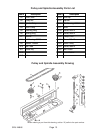
1. Position the Base (B6) on a level and sturdy floor for mounting.
Bolt the Base to the floor using appropriate hardware (not supplied). Base holes will
accommodate 7/16 inch bolts. Pull out the Wire Stabilizer (B21) rod from the rear of
the Base.
2. Place the Column Support (B4) on the Base, aligning the mounting holes.
3. Insert four large Hex Screws (B5) into the mounting holes and tighten with a wrench.
4. Insert the Column (B1) into the Column Support (B4) and secure with Screw (B3).
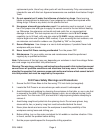
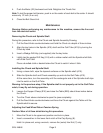
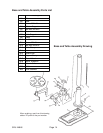
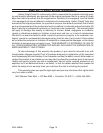
Chuck (A12)
Table (B20)
Column Collar (B19)
Moving Bar (32)
Clamping Lever (30), Right
Belt Guard (A25)
Motor (22)
Clamping Lever (30), Left
Crank (B8)
Feed Knob (34)
Switch (2)
Column (B1)
Column Support (B4)
Base (B6)
Table Support (B7)
Wire Stabilizer (B21)