


Page 8For technical questions, please call 1-800-444-3353.SKU 45689
OPERATING INSTRUCTIONS
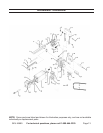
NOTE: For additional references to the parts listed below, refer to the Assembly Dia-
gram on page 13 of this manual.
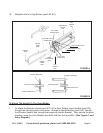
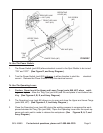
To Adjust The Tong And Operating Lever Pressure:
1. Caution: Prior to adjusting the Tongs (parts #46, #47) and Operating Lever (part #5)
pressure, make sure the Spot Welder is disconnected from its electrical supply source.
2. NOTE: Excessive Tong (parts #46, #47) can damage the Tong Tips (part #48). Do not
use the Tongs as a clamp or vice to hold the workpieces together. If the workpieces to
be welded do not make good contact at the point of the intended weld, clamp the work-
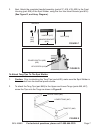
pieces together to provide good contact between the surfaces. (See Figures A, and
Assy. Diagram.)
3. The Tongs (parts #46, #47) pressure is adjustable, and should be checked and/or set
before operation. Correct Tong pressure is necessary to create a proper weld and to
prevent damage to the Tong Tips (part #48). (See Figures A, F, and Assy. Diagram.)
4. If the Tongs (parts #46, #47) pressure is too weak, and the workpieces are loose
when the Tongs close severe arcing will occur between the workpieces and no weld can
be made. To increase the Tong pressure, loosen the front Hex Jam Nut (part #10).
The more the front Hex Jam Nut is loosened, the greater the pressure on the Tong Tips
(part #48) when the Operating Lever (part #5) is closed. Next, turn the rear Hex Jam
Nut toward the Top Tong Clamp (part #13) to lock the desired pressure in position. (See
Figures A, F, and Assy. Diagram.)
5. If the Tongs (parts #46, #47) pressure is too strong, the weld nugget will dimple,
and material will splash out around the nugget area. To decrease the Tong pressure,
loosen the rear Hex Jam Nut (part #10) and turn the front Hex Jam Nut (part #10) to-
ward the Top Tong Clamp (part #13) to lock the desired pressure in position. (See Fig-
ures A, F, and Assy. Diagram.)
6. The farther down the Cap Screw (part #3) is turned, the farther down the Operating Le-
ver (part #5) will close. Adjusting the Cap Screw will determine if the Tongs (parts #46,
#47) clamp down on the material, or just pull up tight. Adjust the Cap Screw to allow the
Operating Lever to be raised easily after the weld has been completed. (See Figures
A, F, and Assy. Diagram.)
7. To adjust the pressure required to push down the Operating Lever (part #5), turn the
Hex Nut (part #20) located on each side of the Front Housing (part #28) clockwise or
counterclockwise. (See Figures A, F, and Assy. Diagram.)
REV 10g