


Page 6SKU 45707 For technical questions, please call 1-800-444-3353.
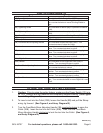
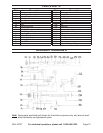
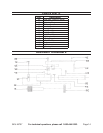
PARTS COMPONENTS
Part Function
(1F) Power Switch Turn right for “ON”. Turn left for “OFF”.
(10A) Turn Wheel Turn clockwise to move Grinding Wheel (21A) to left.
Turn counterclockwise to move Grinding Wheel to
right.
(8A) Tightening Screw Turn clockwise to reduce play in Spindle End Sleeve
(14A).
(9A) Tightening Screw Turn clockwise to reduce play in Spindle Sleeve
(16A).
(5A) Wheel Dresser Handle Turn downward to dress Grinding Wheel (21A).
(3F) Lamp Adjustable.
(4F) Lamp Bulb 120 Volt, 35 Watts
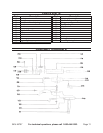
(3B) Front/Back Micro Adjusting Handle Turn clockwise to open the Collet (20B). Turn
counterclockwise to close the Collet.
(9C) Handle Turn clockwise to lock X travel of Sharpening Jig in
place. Turn counterclockwise to unlock.
(9B) Handle Turn clockwise to lock Y travel of Sharpening Jig in
place. Turn counterclockwise to unlock.
(23B) Handle Turn clockwise to lock X travel of Sharpening Jig in
place. Turn counterclockwise to unlock.
(29A) Right/Left Level Supports X travel of Sharpening Jig.
(30A) Handle Turn clockwise to lock Right/Left Level (29A) in
position. Turn counterclockwise to unlock.
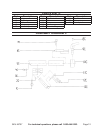
(2A) Front/Back Adjusting Knob Turn clockwise to lock Turn Wheel (4A) in position.
Turn counterclockwise to unlock.
(4B) Handle Turn clockwise to lock Y travel of Sharpening Jig in
position. Turn counterclockwise to unlock.
(5B) Handle Turn clockwise to lock Y travel of Sharpening Jig in
position. Turn counterclockwise to unlock.
(4A) Turn Wheel Turn clockwise to move Right/Left Level (29A) to
right. Turn counterclockwise to move Right/Left Level
to left.
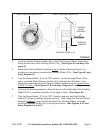
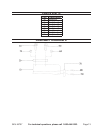
TO USE THE TOOL CUTTER FEATURE
Caution: Prior to using the cutter feature, make sure the Power Switch (1F) is in
its “OFF” position and the machine has completely stopped running. (See Figure
A, and Assy. Diagram F.)
To insert a tool into the Collet (20B), loosen the Handle (9B) and pull the Sharp-
ening Jig forward. (See Figure A, and Assy. Diagram B.)
Turn the Front/Back Micro Adjusting Handle (3B) counterclockwise to open the
Collet (20B). Insert the tool into the Collet (20B). Then, turn the Front/Back
Micro Adjusting Handle clockwise to lock the tool into the Collet. (See Figure A,
and Assy. Diagram B.)
1.
2.
3.
REV 02b, 07g