


Page 7SKU 45707 For technical questions, please call 1-800-444-3353.
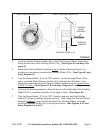
Push the Sharpening Jig forward until the tip of the tool is 1/16” from the surface
of the Grinding Wheel (21A). Then, retighten the Handle (9B) to lock the Sharp-
ening Jig in place. (See Figures A, B, and Assy. Diagrams A, and B.)
Turn the Power Switch (1F) to its “ON” position. (See Figure A, and Assy. Dia-
gram F.)
To move the tool forward and into the spinning Grinding Wheel (21A), turn the
Front/Back Micro Adjusting Handle (3B) clockwise. To move the tool backward
and away from the spinning Grinding Wheel, turn the Front/Back Micro Adjusting
Handle counterclockwise. (See Figures A, and B, and Assy. Diagrams A, and
B.)
When the tool cutting procedure is completed, turn the Power Switch (1F) to its
“OFF” position and wait until the Grinding Wheel (21A) has completely stopped
spinning. (See Figure A, and Assy. Diagrams A, and F.)
Loosen the Handle (9B) and pull the Sharpening Jig forward. (See Figure A,
and Assy. Diagram B.)
Turn the Front/Back Micro Adjusting Handle (3B) counterclockwise to open the
Collet (20B) and remove the tool. (See Figure A, and Assy. Diagram B.)
DRESSING THE GRINDING WHEEL
NOTE: Before each use, check the Grinding Wheel (21A) for worn areas on its
at side and edge. If wearing is evident, it will be necessary to dress the Grind-
ing Wheel. (See Figure B, and Assy. Diagram A.)
Caution: Prior to beginning the wheel dressing procedure, make sure the Power
Switch (1F) is in its “OFF” position and the Grinding Wheel (21A) has completely
stopped spinning. (See Figure A, and Assy. Diagram F.)
4.
5.
6.
7.
8.
9.
1.
2.