


SKU 47016 For technical questions, please call 1-800-444-3353. Page 7
Maintenance
Cleaning (Gun should be attached to compressor to complete the cleaning process)
Warning!! Do not use paint strippers on this unit as they will damage the aluminum. Never
allow the unit to lay on it’s side while paint is in the Cup (#19).
1. Empty paint from Cup (#19) and add small amount of clean solvent. Replace Lid (#23)
and shake Cup (#19) vigorously. At the lowest possible pressure, spray out the solvent into a
waste bucket (make sure you are wearing respirator and eye protection).
2. Empty Cup (#19) of remaining solvent and repeat the process until the Cup (#19) solvent
appears clean and free of the paint.
3. Disconnect air supply. Remove surplus solvent and wipe the Cup (#19) clean with a lint
free cloth.
Note: The Cup (#19) may be fully immersed in solvent for no more than 24 hours if needed.
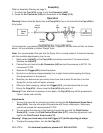
4. Remove the Air Cap (#3) and the Ring (#4). Remove the Brass Ring (#5) and unscrew
the Fluid Nozzle (#6), and remove it. Use the Brush (#1) to clean the Paint Needle (#14)
with solvent. When replacing the Fluid Nozzle (#6), do not overtighten. Overtightening of the
Fluid Nozzle (#6) will result in leakage. Unscrew the Fluid Control Knob Lock (#17) and
remove the Fluid Control Knob (#18). Use the Brush (#1) to clean the gun body
opening that the Fluid Control Knob (#18) fits in, and clean all of the parts.
Reassemble gently. Parts may be damaged if forced into place.
Note: Always dispose of paints and solvents properly. Consult the local hazardous
waste authority for proper disposal procedures and sites.
IMPORTANT: Before using for the first time, the spray gun must be cleaned
using a solvent based thinner. If not removed, the red oil used by the
manufacturer for testing and corrosion protection may contaminate paint.
IMPORTANT: The Spray Gun must be cleaned immediately after use.
Improper cleaning is a common reason for the Spray Gun not to work.
REV 12/05