


Page 4
SKU 47890
Warning: The warnings, cautions, and instructions discussed in this instruction manual can-
not cover all possible conditions and situations that may occur. It must be understood by the
operator that common sense and caution are factors which cannot be built into this product,
but must be supplied by the operator.
Unpacking
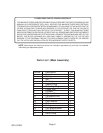
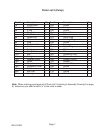
When unpacking, check to make sure the parts listed on pages 6 and 7 are included. If any
parts are missing or broken, please call Harbor Freight Tools at the number on the cover of
this manual as soon as possible.
Warning: This product contains or produces a chemical known to the State of Califor-
nia to cause cancer and birth defects (or other reproductive harm). (California Health
& Safety Code 25249.5 et seq.)
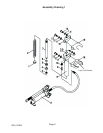
Assembly
The only assembly required is the mounting of the large or small set of Coil
Brackets (#16).
Removing existing Coil Brackets (#16).
1. On the Coil Bracket Base (#15), remove the existing Coil Brackets (#16) by removing
the Bolt (#13), Lock Washer (#12), and Washer (#11). Repeat with other side.
Adding a Coil Bracket (#16 ).
2. Line up the holes on the Coil Bracket (#16) with the holes on the Coil Bracket
Base (#15). Put a Lock Washer (#12), and a Washer (#11) on a Bolt (#13), and thread it
through the Coil Bracket Base (#15), into the Coil Bracket (#16 ). Repeat with other side.
Operation
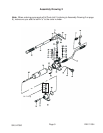
Refer to both Assembly Drawings on pages 8 and 9.
Note: This product is to be used to remove a strut spring from a strut assembly previ-
ously removed from a vehicle. For the purpose of this manual, it is assumed that this
tool will be used to remove a strut spring from a generic type of strut assembly previ-
ously removed from a vehicle. You must follow the directions in the vehicle manual (not
included) specific to your strut assembly
1. Attach the hose from the Hand Pump (#17) to the Cylinder Screw (#9) within the
Connection Nut (#10).
2. Tighten (clockwise) the Release Valve (#15a) on the Pump (#17).
3. To move the Coil Brackets (#16) closer together slowly pump the Handle Grip (#38a).
4. To adjust them away from each other, loosen (counterclockwise) the Release Valve (#15a)
on the Pump (#17).