


Page 5
SKU 47890
Operation (continued)
5. De-grease the spring to be compressed. Never attempt to compress a dirty spring as it
may slip from the brackets causing injury or damage.
6. Make sure you have the proper size Coil Brackets (#16) for the spring. If not, change
them according to the assembly directions on page 4.
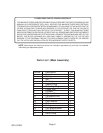
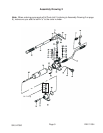
7. Adjust the Coil Brackets (#16) according to the directions under Operation on page 4 so
that the recessed lips (See Assembly Drawing 1) of the Coil Brackets (#16) fully contact the
furthermost top and bottom spring coils within the strut assembly.
Note: Make sure you tighten (clockwise) the Release Valve (#15a) on the Pump (#17).
8. Check to make sure that the top and bottom of the vehicle’s spring coils are firmly in
contact with the Coil Brackets (#16).
9. Clear the area of all observers.
10. Keep your hands clear of the spring.
11. Slowly pump the Handle Grip (#38a) to compress the spring.
Removing strut assembly from spring.
12. After fully compressing the spring, remove the spring from the strut assembly by following
the manual (not included) specific to your struts. Per the manual’s (not included) instructions,
remove the appropriate hardware (Upper Spring Cap & Piston Rod Nut) that connects the
spring to the strut assembly.
13. Slowly release (counterclockwise) the Release Valve (#15a) on the pump to release the
load on the Spring Compressor.
14. If necessary (according to the strut manual) loosen nuts that hold spring to the strut
assembly.
15. The vehicle’s strut assembly may now be removed from the Spring Compressor.
Reassembly
16. Reassemble the strut assembly with the exception of the Spring Cap & Piston Rod Nut.
17. Follow steps five through eleven above to compress the spring.
18. Following the strut manual (not included), replace the strut assembly hardware into the
spring, securing the Piston Rod Nut onto the Piston Rod, and replacing the Upper Spring
Cap.
19. Slowly release (counterclockwise) the Release Valve (#15a) on the pump to release the
load on the Spring Compressor. Once the Coil Brackets (#16) are clear of the furthermost
top and bottom spring coils, remove the tool.
To keep the pump working properly, air must be bled from the hydraulic system when
performance begins to decline.
1. Tighten (clockwise) the Release Valve (#15a) on the pump while the pump hose is still
attached to the main assembly.
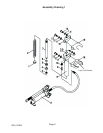
2. Remove the Oil Fill Cap (See Assembly Drawing 2). Pump the Handle Grip (#38a) slowly
to bleed air from the system. Repeat until no more air leaves the system.
3. Add clean, high quality hydraulic oil if necessary and then replace the Oil Fill Cap . Loosen
(counterclockwise) the Release Valve (#15a).
4. Test the pump by tightening the Release Valve (#15a) and pumping the Handle
Grip (#38a) ten times, making sure the Coil Brackets (#16) compress. If the pump is still not
performing properly, repeat the bleeding procedure.
Maintenance