


Page 8SKU 06098
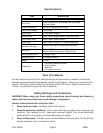
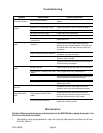
Rated DC Output Set Power Switches Amps Duty Cycle Volts
Maximum OCV 28V
Min. -- 1 25 100% 15.2
Min. -- 2 35 90% 15.7
Max. -- 1 50 45% 16.5
Max. -- 2 75 20% 17.7
5. While holding the Welding Torch handle, with the electrode wire clearly out of the way
of any grounded objects, turn the On/Off Switch to the ON position.
6. Momentarily press the Welding Torch trigger switch to test the wire feed speed.
Adjust the speed by turning the Wire Feed Speed Control knob.
7. Orient yourself on the area to be welded, then hold the Arc Shaded Face Shield over
your eyes.
Warning: Never look at the ignited arc without ANSI approved, arc shaded, eye protec-
tion in a full face shield. Permanent eye damage or blindness can occur. Skin burns can
occur. Never breath arc fumes.
8. Press (and hold) the Torch Trigger Switch and stroke the area to be welded with the
electrode wire to ignite the arc.
Never tap the electrode wire into the welding surface to ignite the arc. This damages
its external coating on the electrode which prevents oxygen in the air from coming into
contact with the molten metal, causing it to oxidize.
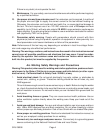
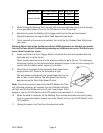
9. Once the arc is ignited, tilt the electrode wire forward at an
angle of about 35°. Refer to the illustration at right.
The wire feeds automatically at a speed dependent on the
Min. or Max. current setting. The wire speed can also be
adjusted using the Wire Feed Speed Control.
Note: If too much current is drawn from the MIG Welder, the Ther-
mal Overload protector will activate, the red Overload indicator
will light, and the Arc Welder will turn off until it cools down. If this
happens, turn the On/Off Switch to the OFF position and wait about 3 ~ 5 minutes.
10. When the weld is complete, lift the Welding Torch handle electrode wire clearly away
from any grounded object, remove your Face Shield, and turn the On/Off Switch to the
OFF position.
11. Unplug the power Line Cord from the electrical outlet.