


Page 12 For technical questions, please call 1-800-444-3353. SKU 6510
Installing Grinding Wheel
Note: Do not use aluminum oxide grind-
ing wheels when grinding nonferrous
metals such as aluminum and brass.
Use silicon carbide grinding wheels
for all nonferrous metals
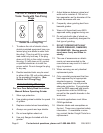
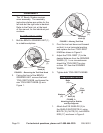
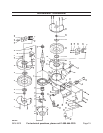
Make sure the inside WHEEL 1.
MOUNTING WASHER (11) is on the
SPINDLE (9) with its concave side
facing out as shown in gure 5.
Place the GRINDING WHEEL (2) on 2.
the SPINDLE.
Place the outside WHEEL MOUNT-3.
ING WASHER (11) on the SPINDLE
with its concave side facing in.
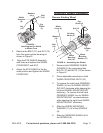
Place the WHEEL MOUNTING NUT 4.
(10) on the SPINDLE and tighten.
Caution; do not over tighten the
WHEEL MOUNTING NUT as it may
crack the GRINDING WHEEL.
Replace both WHEEL COVERS (6) 5.
and secure with their BOLTS (12),
NUTS (13), and WASHERS (14).
Dressing the Wheel
New wheels frequently are not true
and during operation often become
grooved, glazed, out of round, or
misshapen. At these times, they will
need dressing. You will need a grind-
ing wheel dresser for this operation.
Dressers are available from Harbor
Freight Tools.
Standing to the side of the wheel, let 1.
the Bench Grinder run for a full min-
ute with no load. If the GRINDING
WHEEL runs straight and true, you
will not need to dress it prior to op-
erating. If it is not, proceed with the
following steps.
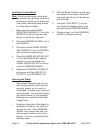
With the Bench Grinder running, grip 2.
the handle of the dresser rmly with
one hand and the arm of the dresser
with the other.
Using the TOOL REST (7) as sup-3.
port, apply the dresser evenly to all
surfaces of the GRINDING WHEEL.
Continue step 3 until the GRINDING 4.
WHEEL is straight and true.