


SKU 65549 For technical questions, please call 1-800-444-3353. Page 5
designed to be used as matched pairs and
should not be mixed.
INTRODUCTION
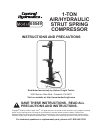
The 1-Ton Air/Hydraulic Spring Compressor 1.
is an air actuated hydraulic unit with alterna-
tive foot operation.
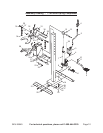
ASSEMBLY
The unit requires minimal assembly before 1.
use.
Attach the Angle Steel (21) to the base of 2.
the Upright (14) by using Bolts (20), Nuts
(18) and Washers (19). Be sure Angle Steel
(21) are xed securely to the base as they
provide stability and will be used to secure
the unit to the oor.
Insert the Foot Pedal (5) into the Socket 3.
(B28) on the hydraulic jack and secure with
the Bolt (10) and Washer (11).
Push Circlips (29) into the groove on each 4.
retaining Pin (30).
Slide the Upper Strut Support (31) over the 5.
Upright (14) to the required height and align
the two holes in the support with two holes
in the Upright. Slide the two Retaining Pins
(30) through the assembly and retain them in
position using the R-clips (32).
Two pairs of shoes (28,28A) are supplied. 6.
Choose one pair of shoes and attach them
to the upper and lower support bracket by
using the socket cap Screw (33), the R-clip
(32), the Retaining Pin (23) and the Circlip
(22). The shoes are designed to be used as
matched pairs and should not be mixed.
The unit must now be xed securely to the 7.
ground in order to ensure the safety of the
user. Mounting holes are to be found in the
brackets, which allow the unit to be secured
by way of masonry bolts or sinking pins (not
included) into concrete.
WARNING! Whichever method is used, ensure the
unit is adequately xed and cannot topple.
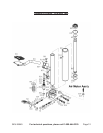
AIR SUPPLY SET UP
Ensure the Air Valve (1) is in the “Off” posi-8.
tion before connecting to the air supply. The
Spring Compressor requires 120 PSI to oper-
ate at full capacity.
WARNING!9. Ensure air supply is clean and
does not exceed 120 PSI.
Too high an air pressure and unclean air will a.
shorten the life of the unit due to excessive
wear, and may be dangerous causing pos-
sible damage and/or personal injury.
Drain the air supply tank daily and clean the b.
Air Inlet Filter (A16) weekly.
When used, drain air lter at least once a c.
day.
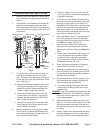
Fig.1
10. For recommended air source and automatic
oiler hook-up, refer to Fig. 1.
Keep hose away from heat, oil and sharp 11.
edges.
Check hoses for wear and make certain that 12.
all connections are secure.
Read the ENTIRE IMPORTANT
SAFETY INFORMATION section at
the beginning of this document
including all text under
subheadings therein before set up
or use of this product.
SAVE THESE
INSTRUCTIONS.