


SKU 65549 For technical questions, please call 1-800-444-3353. Page 6
OPERATING INSTRUCTIONS
Measure the outer diameter of the spring to 1.
be compressed and select the correct set of
Shoes.
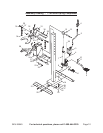
Press down on the Release Valve Pedal (6) 2.
releasing air pressure to lower the Under
Strut Support until the Ram is fully retracted
and the Under Strut Support (24) is at its low-
est position.
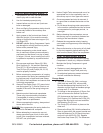
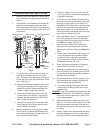
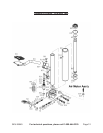
Fig. 2
A
B
Ram
Spring
Compressed
Top Cap Nut
Upper Strut Mount
Under
Strut
Support
Dust
Cover
Strut Housing
Lower Strut
Mount
Lower
Spring
Seat
Upper
Spring
Seat
Spring
Un-compressed
Upper Shoe (9)
3. The upper Shoe (28) should bear down on
the rst full coil down from the top of the
strut. The lower Shoe should be pushing up
on the rst full coil up from the bottom of the
strut. (See Fig. 2.)
Measure the distance between these coils a.
and adjust the position of the upper strut
support so that the distance between the
Shoes is slightly larger than required.
Ensure that the Retaining Pins (30) hold-b.
ing the Upper Strut Support (31) are fully
inserted and secured with the R-Clip (32)
and Circlips (29) provided.
Use the Foot Pedal (5) to raise the Under c.
Strut Support (24) to nely adjust the dis-
tance between the Shoes.
Before compressing, make a visual inspec-4.
tion of the tool to ensure all Retaining Pins
are securely positioned and that there is no
sign of wear or metal fatigue.
If wear or fatigue is found, do not use the a.
Tool. Have the tool replaced or repaired by
a qualied technician.
Fit the strut into the Shoes (28) and ensure 5.
that the lower coil used lies behind the inner
retaining rim at the back of the Shoe (28).
Operate the Foot Pedal (5) to raise the upper
coil end into contact with the upper spring
seat, ensuring the coil at both ends are se-
curely retained by the raised inner and outer
rims within the Shoes (28, 28A).
Wrap one Safety Chain (37) around the por-6.
tion of the spring and strut protruding from
the upper Shoe (28) ensuring that the Chain
lies above the Shoe. (See Fig. 2.)
Wrap the other Safety Chain around the 7.
spring and strut protruding from the lower
Shoe ensuring that the Chain lies below the
Shoe.
Fasten each Chain behind the Upright (14) a.
using the attached spring catches. Make
sure each Chain is as tight as possible.
Do not position the Chain in the coils held
between the Shoes (28, 28A).
When applying compression to the spring, 8.
always stand to one side of the unit.
Gradually compress the spring by pumping 9.
the Foot Pedal (5) or operating the Air Valve
(1) ensuring that the spring and strut remain
securely held at all times.
Ensure that the strut and the Upright (14) of 10.
the compressor are correctly aligned at all
times during spring compression.
For conical springs, the center line of the a.
spring should remain parallel to the com-
pressor body.
DANGER! Stop compressing the spring before the
coil windings touch. You need only compress
the spring until the upper spring seat is free
from spring pressure.
Before attempting to remove top cap nut on 11.
the strut, use a tool or short stick to test if the
spring compression has been relieved from
the upper spring seat. Do not use your hands
or ngers.
Harbor Freight Tools recommends the use of 12.
properly designed strut tools to remove the
top cap nut from the shock absorber piston.