


SKU 65549 For technical questions, please call 1-800-444-3353. Page 7
Ensure that the shock absorber is supported a.
as the top cap nut is removed to prevent it
falling down through the coils and causing
injury.
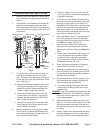
Once compressed and the strut removed, it 13.
is recommended to release the tension on
the spring.
Do not leave the spring under compression a.
unattended and do not leave in compres-
sion for prolonged periods. I.e. overnight.
Allow the spring to gradually decompress by 14.
carefully pressing the Valve Release Pedal
(6) keeping your hands and ngers away
from the spring assembly.
Replace the spring or shock absorber as 15.
necessary and reassemble the strut by rst
compressing the spring and then introduc-
ing the shock absorber up through the lower
Shoe (28) and compressed spring coils.
Re-position the upper strut mount and se-a.
cure with the top cap nut.
Before releasing the compression, ensure 16.
that the top cap nut is securely tightened ac-
cording to the manufacturer’s specs.
Release the compression slowly keeping 17.
your hands and ngers away from the spring
assembly.
Be sure that the spring ends are rmly and 18.
securely seated in the upper and lower
Shoes of the Compressor before removing
the strut from the Spring Compressor.
MAINTENANCE
Before each use, check the compressor to 1.
ensure it is not damaged or worn. If in any
doubt DO NOT use the tool.
Remove it from service immediately and a.
have it replaced or repaired by a qualied
technician.
Relling the hydraulic system with oil is rarely 2.
necessary but the oil level should be checked
in the event of a loss of performance.
To check oil level, ensure the Under Strut a.
Support (24) is fully lowered, remove ller
plug and check that level is within .4" of ller
hole. Add hydraulic jack oil if necessary.
WARNING: DO NOT use brake uid, or any uid
other than hydraulic jack oil as this will cause
serious damage to the jack and invalidate the
warranty!
Bleeding the Hydraulic System
The Strut Spring Compressor must be se-3.
curely mounted on a at and level surface.
Wipe the Oil Filler Plug (38) and its surround-4.
ing area at the side of the Ram (7).
With the tip of a at tip screwdriver, pry and 5.
remove the rubber Oil Filler Plug.
Pour fresh hydraulic jack oil into the Ram (7) 6.
until it starts to overow.
Step on the Valve Release Pedal (6) and 7.
allow the Under Strut Support (24) to be
lowered completely.
While holding the Valve Release Pedal (6) 8.
down, rapidly pump the Foot Pedal (5) at
least ve full strokes. This should purge the
air out of the system.
Repeat step 6 above to make sure that the 9.
Ram (7) is lled with oil.
Wipe the plug and place its edge against 10.
the ll-hole and while applying thumb force
behind the plug, work the rubber plug back
into the ll-hole with the aid of the at tipped
screwdriver.
After the plug is inserted, wipe off spilled oil 11.
from jack exterior with a clean and dry rag.
CAUTION: DO NOT operate the jack when the Oil
Filler Plug (38) is removed.
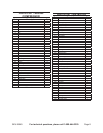
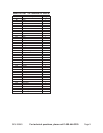
PLEASE READ THE FOLLOWING
CAREFULLY
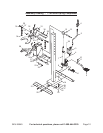
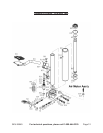
THE MANUFACTURER AND/OR DISTRIBUTOR HAS
PROVIDED THE PARTS LIST AND ASSEMBLY DIAGRAM
IN THIS DOCUMENT AS A REFERENCE TOOL ONLY.
NEITHER THE MANUFACTURER OR DISTRIBUTOR
MAKES ANY REPRESENTATION OR WARRANTY OF ANY
KIND TO THE BUYER THAT HE OR SHE IS QUALIFIED
TO MAKE ANY REPAIRS TO THE PRODUCT, OR THAT
HE OR SHE IS QUALIFIED TO REPLACE ANY PARTS OF
THE PRODUCT. IN FACT, THE MANUFACTURER AND/OR
DISTRIBUTOR EXPRESSLY STATES THAT ALL REPAIRS
AND PARTS REPLACEMENTS SHOULD BE UNDERTAKEN
BY CERTIFIED AND LICENSED TECHNICIANS, AND NOT
BY THE BUYER. THE BUYER ASSUMES ALL RISK AND
LIABILITY ARISING OUT OF HIS OR HER REPAIRS TO THE
ORIGINAL PRODUCT OR REPLACEMENT PARTS THERETO,
OR ARISING OUT OF HIS OR HER INSTALLATION OF
REPLACEMENT PARTS THERETO.