


SKU 66630 For technical questions, please call 1-800-444-3353. Page 11
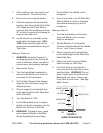
(109) and that the tabs are on the
INSIDE slot of the Splitter.
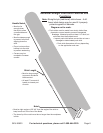
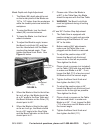
Use a framing square (not included) 8.
to make sure the Saw Blade and
Splitter assembly are square. If not
square, loosen the Splitter Bracket
and adjust until the Splitter is properly
aligned with the Saw Blade. Then
tighten all screws and bolts.
Mounting
The Saw MUST be properly secured 1.
to the supporting surface using the
four mounting holes at each corner
of the Base (5).
If mounting Table Saw to a leg stand 2.
(not included), insert screws through
the holes in each corner and into
the pre-drilled holes in the leg stand.
Tighten together using washers, at
washers and nuts (hardware not
included.)
If placing Table Saw on support sur-3.
face, insert the Rubber Feet (1) into
each corner of the Base to dampen
the vibration.
Please note: Before the Table Saw is
placed on supporting surface, please
verify that supporting surface has a
11”-12” square hole to allow for saw-
dust to fall through and be removed.
If the supporting surface does not 4.
have the hole, square the Table Saw
on the supporting surface and mark
the location of the four 5/16” holes to
be drilled.
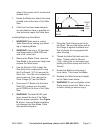
Locate and mark an 11”-12” square 5.
that is centered between the four
mounting holes. Once marked, cut
out and remove the square. This
will allow sawdust to fall through the
Table Saw’s Base.
Securely fasten the Table Saw to the 6.
supporting surface using washers,
at washers and nuts (hardware not
included.)
WARNING! 7. Failure to provide this
sawdust removal hole will allow
sawdust to build up around the mo-
tor, which can potentially lead to a
re hazard and/or damage the motor
assembly.
OPERATING INSTRUCTIONS
Read the ENTIRE IMPORTANT
SAFETY INFORMATION
section at the beginning of this
manual including all text under
subheadings therein before set
up or use of this product.
Table Saw Adjustments
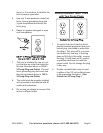
TO PREVENT
SERIOUS INJURY
FROM ACCIDENTAL
OPERATION:
Turn the Power Switch of the
tool to its “OFF” position,
remove key, and unplug the
tool from its electrical outlet
before performing any
inspection, maintenance, or
cleaning procedures.
WARNING! Check the Blade
Guard assembly before and
after every use.