


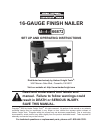
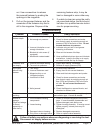

SKU 66872 For technical questions, please call 1-800-444-3353. Page 11
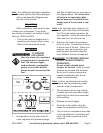
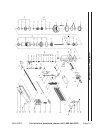
3. Slide the Magazine out all the way.
4. Insert the required size Fasten-
ers (3/4”, 1”, 1-1/4”, 1-1/2” or 1-3/4”
16-gauge) into the Magazine with the
point towards the Nozzle. WARN-
ING! Insert ONLY one size of fasten-
er at a time. Do NOT load fasteners
of different sizes together.
5. Slide the Magazine back into place
until the Pusher (71) locks in.
6. Air exhaust may be directed in any
direction. Rotate the Exhaust Valve
Cover (1) to keep exhaust from blow-
ing back at the operator’s face.
General Operating Instructions
1. Test the Tool, as directed in the prior
section, before each use.
2. If an automatic oiler is not used, add
a few drops of Pneumatic Tool Oil
to the airline connection before use.
Add a few drops more after each
hour of continual use.
3. Place the Nozzle on a scrap material,
preferably the same thickness and
type of material as the workpiece.
Press the Trigger (40) to activate the
Nailer. Performing this test-ring will
help you to set the correct air pres-
sure (not exceeding 90 PSI) to prop-
erly drive the fastener.
4. Grip the Body (29) of the Nailer with
both hands and press the Nozzle
(59) against the surface you wish to
fasten. Be sure to keep hands, n-
gers and other body parts away from
Nozzle.
5. Press the Trigger (40) to activate the
Nailer.
6. If the tool requires more force to
accomplish the task, verify that the
tool receives sufcient, unobstructed
airow (CFM) and increase the
pressure (PSI) output of the regulator
up to the maximum air pressure
rating of this tool.
CAUTION! TO PREVENT TOOL
AND ACCESSORY FAILURE,
RESULTING IN INJURY:
Do not exceed the tool’s maximum
air pressure rating.
If the tool still does not have sufcient
force at maximum pressure and
sufcient airow, then a larger tool
may be required.
7. To prevent accidents, turn off the
tool, detach the air supply, safely
discharge any residual air pressure
in the tool, and release the trigger
after use. Clean external surfaces of
the tool with clean, dry cloth. Then
store the tool indoors out of children’s
reach.
USER-MAINTENANCE
INSTRUCTIONS
Procedures not specically
explained in this manual
must be performed only by a
qualied technician.
TO PREVENT
SERIOUS INJURY
FROM ACCIDENTAL
OPERATION, BEFORE ANY
MAINTENANCE OR REPAIRS
ARE DONE (including clearing
jams):