


Page 5For technical questions, please call 1-800-444-3353.SKU 69243
REV 07h
Maintenance and Servicing
Proceduresnotspecicallyexplained
in this manual must be performed
onlybyaqualiedtechnician.
TO PREVENT SERIOUS INJURY
FROM ACCIDENTAL OPERATION:
Turn Line Buttons off before performing any
inspection, maintenance, or cleaning procedures.
TO PREVENT SERIOUS INJURY
FROM TOOL FAILURE:
Do not use damaged equipment.
If abnormal noise or vibration occurs, have
the problem corrected before further use.
Installing and Removing
Batteries
1. Remove the Battery Cover (see Figure 2
on page 4) and insert two new ‘AA’ Batteries.
Follow the polarity symbols so that the positive and
negative ends of the batteries match the diagram.
2. WARNING! Do not mix old and new batteries.
Remove batteries when storing Laser.
Replacement Parts
NOTE: Internal replacement parts are
not available for this item.
Cleaning and Maintenance
1. BEFORE EACH USE, inspect the general
condition Laser Level. Check for loose
hardware, misalignment or binding of moving
parts, cracked or broken parts, and any other
condition that may affect its safe operation.
2. AFTER USE, wipe external surfaces
of the tool with clean cloth.
3. Store the Laser Level indoors and
out of children’s reach.
Accuracy Checking
NOTE: Due to the complicated, sensitive
nature of these procedures, ordinarily only a
qualied technician would attempt them.
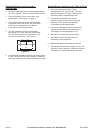
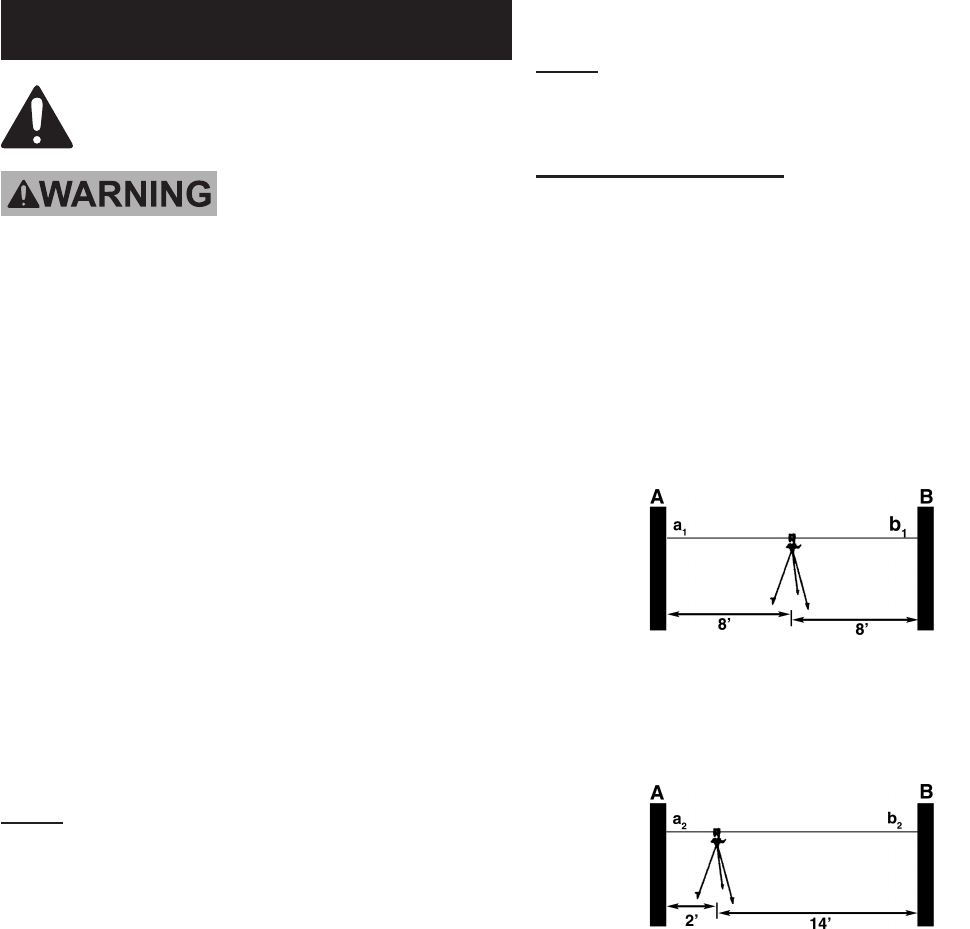
Level Beam Accuracy
1. Set up the instrument with the Tripod centered
between two walls approximately 16 ft. apart.
Ensure the Rotary Base is level.
2. Push the Pendulum Lock to the right to free
the pendulum. See Figure 1 on page 3.
3. Press both the horizontal and vertical buttons to
project a laser cross on wall A. Mark point a
1
at
the intersection of the beams. Turn the cross line
laser 180° and repeat on wall B, marking point b
1
at the intersection of the beams, see Figure 4.
Figure 4
4. Move the instrument straight towards wall A to
a point 2 ft. away and repeat step 2, marking
the intersections as a
2
and b
2
, see Figure 5.
Figure 5
5. a distance (d
a
)=|a
1
-a
2
|
b distance (d
b
)=|b
1
-b
2
|
If |d
a
- d
b
| <1mm, the accuracy is within tolerance.
Otherwise, return the instrument to a qualied
technician for repair.