


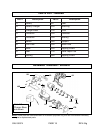
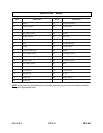

SKU 90374 PAGE 16
6. Whenever possible, secure the workpiece that is to be drilled in a vise or with
clamps.
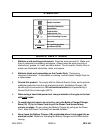
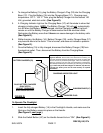
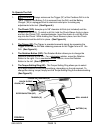
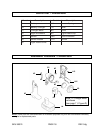
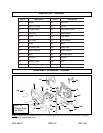
7. When installing drill bits or the Screwdriver Bit (31F), make sure the Battery (1A) is
removed from the Drill to avoid accidental starting. Then, insert and lock inplace
a drill bit or Screwdriver Bit in the Chuck (12F) of the Drill.
(See Figure H.)
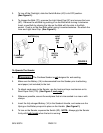
8. Insert the fully charged Battery (1A) in the Drill’s Handle, and make sure the
Spring
on the Battery snaps into place on the Handle. (See Figure H.)
9. Lubricate the cutting tip of the drill bit with cutting oil when drilling iron or steel.
Use a coolant when drilling non-ferrous metals such as copper, brass, or
aluminum.
10. When drilling in light gauge metal or wood, use a wooden block to back up the
material to prevent damage to the workpiece.
11. Mark the center of the hole to be drilled with a center punch to give a drill bit a
start and to prevent it from “walking”.
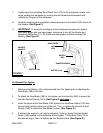
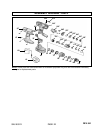
12. To turn on the Drill, squeeze the Trigger (3F).
NOTE: Always grip the Drill firmly
with both hands when the tool is running. (See Figure H.)
13. Drill only as deep as necessary. Do not drill deeper than necessary into walls or
other areas where you cannot identify any possible hazards behind the drilling
surface.
14. To reduce jamming as the drill bit breaks through the workpiece, decrease the
drilling pressure when the point of the drill bit breaks through the workpiece.
15. When you have drilled the hole, remove the drill bit from the hole while the Drill is
still running. This prevents the drill bit from getting caught in the hole and causing
damage.
16. Release the Trigger (3F) to stop the Drill. Then, remove the Battery (1A) and drill
bit from the Drill.
INSPECTION, MAINTENANCE, AND CLEANING
1. WARNING! Always remove the Battery Pack (1A) from a tool and
unplug the Battery Charger (1B) from its electrical outlet before performing
any inspection, maintenance, or cleaning on the tool.