


SKU 91179 For technical questions, please call 1-800-444-3353. Page 6
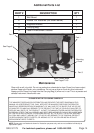
H
IV
Horizon-
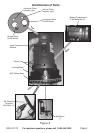
Figure C
Figure A
Figure B
(2)
3 “AA” Batteries
Pendulum
Lock “door”
(bottom of Laser)
Indicator
Light
Vertical
Light
tal Light
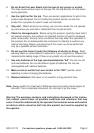
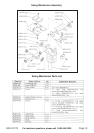
Unpacking
When unpacking, check to make sure the parts shown on the cover of this
manual are included. If any parts are missing or broken, please call Harbor
Freight Tools at the number on the cover of this manual.
Operating Instructions
A Tripod may also be used with the Cross Line Laser (not included).
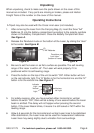
1. After removing the Laser from the Carrying Bag (4), insert the three “AA”
Batteries (2) into the battery compartment according to the polarity symbols
shown in the Battery Compartment.
Close the Battery Compartment door.
See Figure A.
2. Release the Pendulum Lock on the bottom of the Laser, by sliding the “door”
to the center.
See Figure B.
3. Be sure to set the Laser on as flat a surface as possible. The self-leveling
range of the Laser is within ±5°. The Laser will work properly if it is
positioned within its self-leveling range.
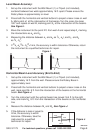
4. Press the button on the top of the unit to switch “ON”. Either button will turn
on the red indicator light. The “H” Button is for the horizontal line and the “IV”
button is for the vertical line.
See Figure C.
5. For safety reasons, after you have pushed either horizontal or vertical
buttons to switch “ON”, there will be a delay of one second before the Laser
beam is emitted. This delay will not happen when pressing the second
button. If the Laser Beam blinks, it means it is still locked or NOT within the
leveling range.
6. Allow 4-6 seconds for the horizontal and vertical Laser lines to be stabilized.
After stabilization, the Laser lines can be used for measurement reference.
Laser lines may swing slightly due to vibration from surroundings.