


SKU 91179 For technical questions, please call 1-800-444-3353. Page 7
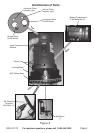
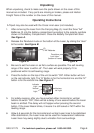
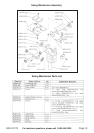
How to Use the Rotary Base:
1. Loosen the Hand Wheel and put the Laser unit on the Rotary Base. Adjust
so that the “center line” under the Laser Window is aligned with the “center
line” of the Rotary Base. Tighten the Hand Wheel. Recognize the rotating
range according to the graduation aiming at the “center line.”
See Figures D & E.
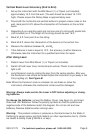
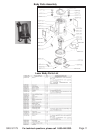
To Use the Wall Mount:
1. Fix the Wall Mount (1) to the wall with screws (not included). Be sure the
holes drilled for the mounting of the screws are level and that the wall is solid
and there are no hidden electrical wires that may interfere. Leave the screws
extended from the wall by about 1/4” so you can slip the Wall Mount (1) on
and off the wall. Use the Adjustment Knob to choose measurements.
See
Figure G.
You can also use the Magnetic Bracket (3) (not shown) for hanging
from a steel beam or shelf.
2. Set the Hand Wheel, Rotary Base and Laser (assembled) on the shelf of the
Wall Mount (1). Use the Mounting Knob for the Wall Mount (1) and thread it
through the shelf and into the threaded hole on the bottom of the Laser/
Rotary Base assembly. Adjust laser level to proper height. Lock it in place
with the Holding Knob on the side of the Wall Bracket.
See Figure F, G & H.
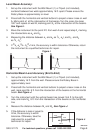
2. Rotating Base has a 360
0
scale. Set at desired increments for measuring,
i.e. tiles for flooring, cabinet installation, wainscoting and wallpapering,
bathroom tiling, putting up pictures, aligning shelves, window framing, etc.
See Figure E.
Laser
Window
Center Line
on Laser
and Center
Line on
Rotary Base
Figure D
Hand Wheel
Center
Lines
Figure E
Figure F
Figure G
Figure H
Mounting
Knob
Wall Mount
Shelf
Holding
Knob