


SKU 92917 & 93253 For technical questions, please call 1-800-444-3353. Page 9
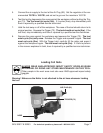
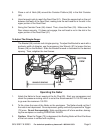
Place a coil of Nails (99) around the Canister Platform (86) in the Nail Canister
(90).
Uncoil enough nails to reach the Feed Pawl (51). Place the second nail on the coil
between the teeth of the Feed Pawl, making sure the nail head fits in the slot in the
upper portion of the Feed Pawl.
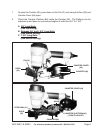
Swing the Canister Cover (84) closed. Then, close the Door (53). Make sure the
Door closes securely. If it does not engage, the nail head is not in the slot in the
upper portion of the Feed Pawl (51).
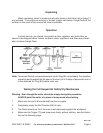
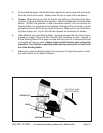
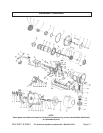
To Adjust The Shingle Gauge:
The Bracket (96) controls roof shingle spacing. To adjust the Bracket to work with a
particular width of shingles, use the accessory Hex Wrench (97) to loosen the two
Screws (28) on the Bracket. Slide the Bracket forward or backward to the desired
spacing. Then, retighten the two Screws.
BOTTOM
VIEW
SCREWS
(28)
BRACKET
(96)
SHINGLE SPACING
3.
4.
5.
Operating the Nailer
Attach the Nailer to the air supply at the Air Plug (83). Start your compressor and
check the pressure making sure it is set at the recommended 70-100 PSI and not
to go over the maximum 100 PSI.
To fire, place the nose of the Nailer on the workpiece. The Nailer should not fire if
the nose is not depressed. Once depressed, gently and briefly squeeze the Trigger
(73) once. Do not fire repeatedly. Nails could bounce off of one another, damag-
ing the workpiece or causing PERSONAL INJURY.
Caution: When the Trigger (73) is depressed, the Roofing Nailer will fire if the Nose
of the tool comes in contact with anything.
1.
2.
3.