SKU 93808 For technical questions, please call 1-800-444-3353.
Page 11
English
OPERATION
Install the Saw Blade. Prepare and secure the material to be cut before turning on
saw. The Battery (H) should have a full charge before using saw. Remove battery before
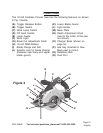
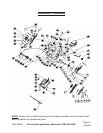
making any adjustments. Refer to Figure 3, on page 18.
INSTALLING CUTTING BLADE
NOTE: The Lock Bolt is a reverse thread.
1. Remove The Battery (O) before making any adjustments.
2. Press on the Spindle Lock Button (J) to keep the Saw Blade from moving while
turning the Blade Bolt (I).
3. Using the Hex Key (P), loosen and remove Lock Bolt (I) and Outer Flange (I).
4. Rotate the Lower Blade Guard (K), counterclockwise to allow entry of the Saw Blade.
5. Insert Saw Blade through the Base Plate (M) until blade fits on the motor spindle.
Notice the arrow on the Lower Blade Guard (K) and the arrow on the Saw
Blade. They should be pointing in the same direction.
6. Replace the Outer Flange (I) and Blade Bolt (I). Tighten with the Hex Key (P) while
pressing on the Spindle Lock Button (J). Verify that the Spindle Lock Button (J) is
in the up (unlocked) position.
7. Replace the Hex Key (P) to its storage hole in the housing of the saw.
ADJUSTING THE SAW PRIOR TO CUTTING
1. To adjust the angle of blade, loosen the Bevel Cut Adjustment Knob (G) and move
Base Plate (M) while observing the degree scale located next to the Bevel Cut
Adjustment Knob (G).
2. To adjust the depth of the cut, loosen the Depth Adjustment Knob (N), which is
located next to the motor housing, and move the Base Plate (M) while observing the
amount of Saw Blade exposed under Base Plate. Tighten the Depth Adjustment
Knob (N) after making the adjustment.
3. Rip Fence installation and adjustment:
The Rip Fence can be inserted into either the left or right side at the toe of the Base
Plate (M). Insert the Rip Fence into the fence guides until it contacts the Retention
Bolt (Q). Loosen the Retention Bolt (Q) until the fence can slide through then secure
it by turning the Retention Bolt (Q) clockwise. The Rip Fence is adjustable from 0”-
5”. ( Refer to Page 18, Fig. 3)


