


SKU 94434 For technical questions, please call 1-800-444-3353 PAGE 9
Make sure to hold the Cordless Drill firmly with both hands, as torque from the Mo-
tor will cause the tool to twist.
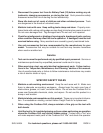
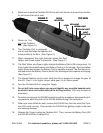
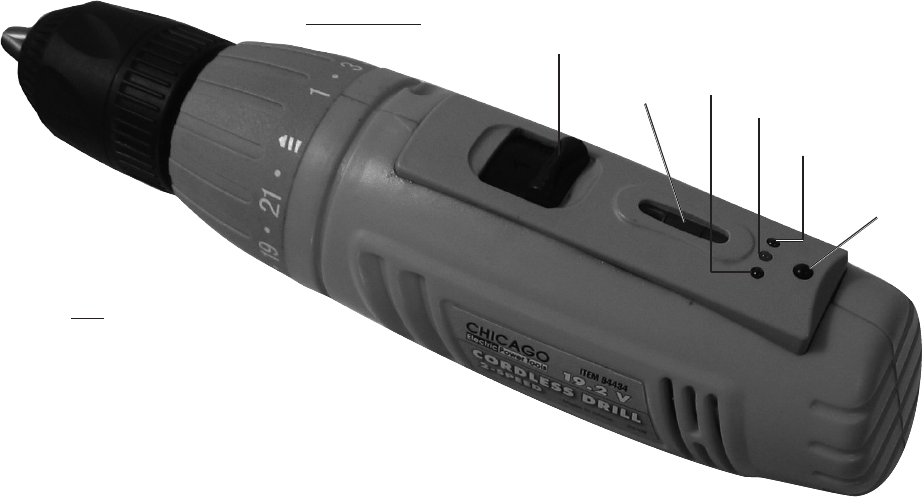
Obser ve the
top of the Cordless
Drill. (See Figure C.)
The Cordless Drill is equipped
with a Level that helps the operator drill
holes parallel to the floor. (See Figure C.)
When depressed, the Light Activator allows the Red,
Yellow, and Green Lights to illuminate. (See Figure C.)
The Red, Yellow, and Green Lights indicate the Battery Pack’s (22) charge level. All
three Lights illuminated means the Battery Pack is at full charge. Red and Yellow
Lights illuminated means the Battery Pack is partially charged. The Red alone illu-
minated means the Battery Pack is almost fully discharged, and requires recharging.
(See Figure C.)
The Speed Selector can be used, while the drill is stopped to change the gear of
the drill. Gear 1 is for higher torque, while gear 2 is for faster speed.
Turn the Cordless Drill on, using the Trigger.
Do not drill into areas where you cannot identify any possible hazards such
as electric wires and cables behind the drilling surface. Drill only as deep as
necessary.
To reduce jamming as the Drill Bit breaks through the workpiece, decrease the drill-
ing pressure when the point of the Drill Bit breaks through the workpiece.
When you have drilled the hole, remove the Drill Bit from the hole while the Cord-
less Drill is still running. This prevents the Drill Bit from getting caught in the hole
and causing damage.
Release the Trigger to stop the Cordless Drill. Then, remove the Battery Pack (22)
and Drill Bit from the Cordless Drill.
8.
9.
10.
11.
12.
13.
14.
15.
16.
17.
18.
GREEN LIGHT
LEVEL
LIGHT
ACTIVATOR
YELLOW LIGHT
FIGURE C
TOP VIEW
RED LIGHT
SPEED
SELECTOR
GREEN LIGHT
LEVEL
LIGHT
ACTIVATOR
YELLOW LIGHT
FIGURE C
TOP VIEW
RED LIGHT
SPEED
SELECTOR