


SKU 94849 For technical questions please call 1-800-444-3353 Page 9
Start at one end of the seam, and apply a heavy bead of the ller continuously until
you reach the other end. The ller must adhere to both sides of the seam and form
a heavy, continuous bead of material.
Operation
Testing your Cordless Caulking Gun
NOTE: Follow the procedure below to test the operation of your Caulking Gun before using
it for the rst time.
Install a charged battery as discussed on page 6.1.
Set the 6-speed Selector (11) at position 3, or above, when rst running the Caulk-2.
ing Gun. Once the motor is running, any of the 6 speeds can be selected.
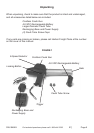
While holding the caulking gun in your right hand, push the Locking Button (7) in. 3.
(If you are holding the gun in your right hand, the Locking Button (7) will be next to
your thumb. Push it in until it pops out on the opposite side of the gun housing). Test
the operation of the tool by squeezing the trigger. The Plunger (46) should move
forward. See the Figure 1 on page 5.
To retract the Plunger (46), push the Locking Button (7) back in until it protrudes 4.
from the left side of the housing. Using your nger, push the Plunger (46) all the way
back to it’s starting location.
Installing a cartridge and using your Cordless Caulking Gun
Cut off the tip of a standard 10.5 oz. cartridge (not included) to open it. Pull down 1.
the Gate at the end of the Cartridge Holder (43), and slide the cartridge, base end
rst, into the Cartridge Holder and onto the Plunger (46). Press the Gate back into
place. Make sure the Plunger (47) is completely retracted before doing this.
Apply the tip of the cartridge to the work material. Squeeze the Trigger (15) to begin 2.
applying material, and move the tip of the cartridge along the seam. Move the 6-
Speed Selector (11) to adjust the rate the material is being applied.
Release the Trigger (15) to stop applying material. Attach on of the Calking Tube 3.
Screw Caps to the end of the cartridge when nished. Remove the cartridge form
the Cartridge Holder (43), see paragraph below.
CAUTION: DO NOT leave the cartridge in the Cordless Caulking Gun when you are n-
ished using it. The material in the cartridge could harden; making it very difcult or impos-
sible to remove it from the Caulking Gun.
Removing the cartridge from your Cordless Caulking Gun
Push the Locking Button (7) back in until it protrudes from the left side of the hous-
ing. Firmly press the cartridge in, as far as it will go, toward the handle. Swing the
Gate open. Pull the cartridge from the Cartridge Holder (43). Swing the Gate to it’s
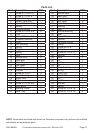
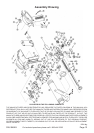
closed position. See the Parts List and Assembly Diagram on pages 11 and 12.
REV 07j, 08f, 08g