


Page 5SKU 95028
For technical questions, please call 1-800-444-3353
Assembly and Operation Instructions (continued)
Note: Performance of the compressor (if powered by line voltage) may vary depending
on variations in local line voltage. Extension cord usage may also affect tool
performance.
1. You will need to prepare a 1/4” air connector (sold separately) to connect to the Air Inlet
(13) on the Air Cut-Off Tool. First, wrap the 1/4” air connector (not included) with pipe
thread seal tape before threading into the Air Inlet (13). Connect a 3/8” I.D. Air Source
Hose to the Cut-Off Tool.
Note: If you are not using an automatic oiler system, before operation add a few drops
of Pneumatic Tool Oil to the airline connection. Add a few more drops after each hour
of continual use.
2. Set the air pressure on your compressor to 90 PSI. Do not exceed the recommended
air pressure of 90 PSI.
3. Check the air connection for leaks.
4. Disconnect the air hose until instructed to reconnect.
5. After disconnecting the air supply, squeeze the Trigger Lever (14) to make sure no air
remains in the unit.
Assembly:
The only assembly required is the mounting of the Cutting Wheel (29).
Warning: the Cut-Off Tool must be disconnected from the air supply when changing
the Cutting Wheel (29). After disconnecting the air supply, squeeze the Trigger Lever
(14) to make sure no air remains in the unit.
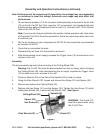
1. Place the Wrench (33) on the flats of the Spindle (25) to hold it in place.
2. Using the Allen Wrench (32), loosen and remove Hex Screw (31) and Spacer (30).
3. Remove and replace the Cutting Wheel (29).
4. Replace the Hex Screw (31) and the Spacer (30). Tighten the Hex Screw (31) while
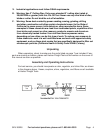
holding the Spindle (25) in place with the Wrench (33). See Figure 1.
Figure 1
WARNING: The Guard (27)
must be in place when using
the Cut-Off Tool.
Allen Wrench (32)
Guard (27)
Spacer (30)
Hex Screw (31)
Cutting Wheel (29)
Spindle (25)