


Page 6SKU 95028
For technical questions, please call 1-800-444-3353
WARNING: Always check the Cutting Wheel (29) for possible wear. Do not use a worn, torn,
or defective cutting wheel.
WARNING: Position the Cut-Off Tool so that the attached guard is in position between you
and the workpiece to protect you from flying debris.
WARNING: The Guard (27) must always be attached to the Cut-Off Tool.
1. Check the Cutting Wheel (29) for wear, Replace if necessary.
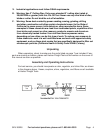
2. Set the compressor to 90 PSI. Do not exceed 90 PSI.
3. Connect the Cut-Off Tool to the air hose as explained on Page 5 of this manual.
4. Use both hands to grip the Cut-Off Tool. Gently squeeze down on the Trigger Lever
(14). Allow the Cut-Off Tool to run for a few seconds before approaching the work-
piece.
5. Let the Cut-Off Tool do the work. Do not apply force on the workpiece.
6. When finished, release the Trigger Lever (14).
7. Disconnect the Air Hose.
8. Gently squeeze down on the Trigger Lever (14) to release any air that might still remain
in the Cut-Off Tool.
1. Warning: Always release any excess air, make sure the Trigger Lever (14) is in its
“OFF” position, and disconnect the Cut-Off Tool from its compressed air supply
before performing any inspection, adjustments, maintenance, or cleaning.
2. Before each use, inspect the general condition of the Cut-Off Tool. Check for loose
screws, misalignment or binding of moving parts, cracked or broken parts, damaged
air hose, and any other condition that may affect its safe operation. If abnormal noise or
vibration occurs, have the problem corrected before further use. Never use damaged
equipment.
3. After each use, wipe down the Cut-Off Tool with a clean cloth, remove all dirt, oil, and
grease from the Cut-Off Tool. If necessary, you may use a mild detergent. Do not use
solvents, as damage to the Cut-Off Tool may occur. Do not immerse the Cut-Off Tool
in any liquids.
Inspection, Maintenance, and Cleaning
Assembly and Operation Instructions (continued)