


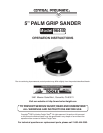

Page 5
SKU 96445
For technical questions, please call 1-800-444-3353
REV 07h
ASSEMBLY
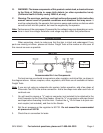
Installing the Sanding Pad
Disconnect the air hose from the tool.
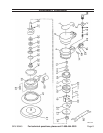
Select the appropriate Sanding Pad (not included), and press it onto the Backing Pad
(41). Firmly press the Sanding Pad onto the Backing Pad (41), making certain it is
securely in place. Failure to properly secure the Sanding Pad may cause the Sanding
Pad to come loose, possibly causing personal injury or property damage.
Installing the Backing Pad
Disconnect tool from air supply.
Slide Wrench (39) under Cover (37) and onto the Tilting Axle (or Arbor) (28). Holding
the Wrench firmly, rotate Tilting Axle (28) counterclockwise to remove.
To replace the Backing Pad (41), place Wrench (39) onto Tilting Axle (28) and hold
firmly.
Place Backing Pad (41) onto Tilting Axle and turn clockwise to attach.
Hand tighten firmly.
OPERATION
Turn the air compressor (not included) on and allow the air tank to come up to pressure.
Set the compressor output regulator to no more than 90 PSI.
Attach the air supply hose (not included) to the tool.
Grip the base of the tool in one hand. The Trigger (1) will be under your palm. Squeeze
the tool to depress the Trigger (1) and the tool will operate.
Place the tool on the work surface to begin sanding.
To stop sanding, lift the tool from the work surface, and relax your grip to allow the Trig-
ger (1) to lift into the OFF position.
When you are done work, disconnect the air pressure hose from the tool and turn off
the air compressor.
1.
2.
1.
2.
3.
4.
5.
1.
2.
3.
4.
5.
6.