


Page 13SKU 96526 For technical questions, please call 1-800-444-3353.
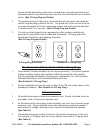
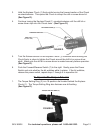
A higher setting equals more torque; therefore, position #1 (low torque) is
appropriate for driving screws into wood without stripping the screw, but would
not provide enough torque for drilling or driving into harder materials.
(See Figure E.)
Position #20 is indicated by a drill bit icon and should be used for drilling only.
(See Figure E.)
Drill Bit Selection
Always use sharp drill bits. Sharp bits are less likely to bind when drilling.
Use the proper drill bit for the job. There are many types of bits designed for
specic purposes. Check the information on the bit’s packaging for proper
usage.
Do not use drill bits larger than the rated capacity of the Drill/Driver. Gear
damage or motor overload may result.
Drilling An Object
CAUTION! Do not operate the Drill/Driver before placing a drill bit on the
material.
Avoid overloading the Drill/Driver. Do not apply excessive pressure to the Drill/
Driver while drilling. If the speed of the tool drops abnormally, decrease the
pressure immediately. If the drill bit stops abruptly or the bit becomes blocked,
release the Power Switch (10) at once.
Ensure the safety of the work space. Clear the work area of all parts and debris
that may cause injury by ying objects.
Before drilling, clamp the object down securely. A poorly secured piece of
material may result in personal injury and/or inaccurate drilling.
When drilling in a light gauge metal or wood, use a wooden block (not included)
to back up the material to prevent damage to the workpiece.
Mark the center of the hole to be drilled with a center punch to give the drill bit a
start and to prevent the bit from “walking.”
Lubricate the drill bit with cutting oil (not included) when drilling iron or steel. Use
a coolant when drilling nonferrous metals such as copper, brass, or aluminum.
Grip the Drill/Driver rmly with both hands. Place the drill bit on the spot that is to
be drilled.
To begin drilling, squeeze the Power Switch (10).
2.
3.
1.
2.
3.
1.
2.
3.
4.
5.
6.
7.
8.
9.