


Page 4SKU 97385 For technical questions, please call 1-800-444-3353.
approved safety equipment, such as
those dust masks that are specially
particles. (California Health & Safety
Code § 25249.5, et seq.)
The warnings, precautions, and in-6.
structions discussed in this instruction
manual cannot cover all possible con-
ditions and situations that may occur.
It must be understood by the operator
that common sense and caution are
factors which cannot be built into this
product, but must be supplied by the
operator.
SAVE THESE
INSTRUCTIONS.
SPECIFICATIONS
Product Applications
May be used with most router
and drill press tables.
Construction/Material
Aluminum Stop
Steel Housing
Hose Adapter Size 2-1/2” Diameter
Overall Dimensions
Collapsed
Dimensions
Extended Fence
Dimensions
H
Additional Features
T-Slots to Accept Featherboards
or Stops / Independently
Adjustable Fence Halves /
Fence Extension & Material
Stop
UNPACKING
When unpacking, check to make sure that
the item is intact and undamaged. If any
parts are missing or broken, please call
Harbor Freight Tools at the number shown
on the cover of this manual as soon as
possible.
INITIAL SET UP
INSTRUCTIONS
Read the ENTIRE IMPORTANT
SAFETY INFORMATION section
at the beginning of this manual
including all text under
subheadings therein before set
up or use of this product.
TO PREVENT
SERIOUS INJURY
FROM ACCIDENTAL
OPERATION:
Turn the Power Switch of the
router or drill press to its
“OFF” position and unplug
the tool from its electrical
outlet before assembling or
making any adjustments to
the Router Table Fence.
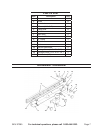
Note: For additional information regarding
the parts listed in the following pages,
refer to the Assembly Diagram near
the end of this manual.
Assembly
To Install The Vacuum Attachment:
Slide the head of two Carriage 1.
Screws (13) into the center channel
of the Fence Slide (5) Repeat the
same procedure for the other Fence
Slide, but insert a Carriage Screw
(14) as well. Guide the four shorter
Screws into the center and adjacent
two holes in the Fence (1)
(See Assy. Diagram.)
WARNING