


Page 12SKU 98199 For technical questions, please call 1-800-444-3353.
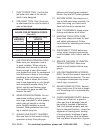
To make a miter cut, loosen the Miter 2.
Lock Knob by turning it approximately
1/4 turn counterclockwise. Press
down the Thumb Lever to unlock the
Table. While holding the Thumb Lever
down, move the Table to the desired
angle. The Miter Angle Indicator will
indicate the selected angle. The table
will lock into place at often used miter
angles, including 22.5º, 30º, 45º, and
90º on both left and right sides.
With the Table adjusted to the desired 3.
angle, place the work piece ush
against the Fence, secure it with the
Hold Down Clamp and make the cut.
Adjusting the Bevel Angle
A bevel cut is one that is at an angle 1.
to the vertical plane of the material.
Bevel cuts can be used to miter 2.
relatively wide and thin material.
Bevel cuts can be used in
combination with a miter cut to form
a compound angle. Compound
angle cuts are often used in crown
moldings, picture frames and similar
trim materials.
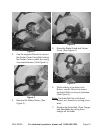
To set the bevel angle, loosen the 3.
Bevel Lock Handle at the rear of the
saw. To do this, press in the Lock
Button and rotate the Handle 1/2
turn counterclockwise. Move the
blade assembly left to the desired
angle. You can read the angle on the
Bevel Angle Indicator. Lock the blade
assembly into position by pressing
in the Lock Button and rotating the
Bevel Lock Handle clockwise. Tighten
rmly but not over-tight.
Make a sample cut in a piece of scrap 4.
and check to be sure the bevel angle
is correct. If it is not, correct the angle
before cutting your work material.
Using the Depth Stop
If you want to make a kerng or 1.
rabbet cut which does not cut through
the work piece, you can use the
Depth Stop Screw to control the
depth of the cut.
To limit blade assembly travel, turn 2.
the Depth Stop Screw clockwise.
The further you screw down the
Depth Stop Screw, the shallower the
cut will be.
After the desired cut has been 3.
made, return the Depth Stop Screw
to its open position by turning it
counterclockwise.
Making a Cut
Observe all safety and planning items 1.
discussed in this booklet. Detailed
instructions on each of the following
steps are discussed in this booklet.
Do not make any cuts until you have
read this entire booklet and are
familiar with the operation of this tool.
Release the Locking Pin to allow the 2.
blade assembly to come up. Check
to be sure the Table is xed in place
at the desired miter angle. Check
to be sure the slide lock is released
to allow the blade assembly to slide
freely.
Blow any sawdust or debris away 3.
from the Fence. Place the work
material against the Fence.
Make any necessary miter or bevel 4.
adjustments.