


Page 6SKU 42818
Auxiliary Wood Fence
To help avoid small, short cut pieces of stock from being caught by the blade or shot off, it is
recommended to mount an auxiliary wood fence to the saw’s metal fence.
1. Cut a 1/2 inch thick piece of wood to match the height and length of the existing fence.
2. Mount the wood fence to the metal fence using flathead screws and nuts (two screws
on each side of the fence).
The wood fence should rest on the table. Screws should be countersunk into the
wood. (Hardware and wood not supplied.)
3. Start the saw and make a 90 degree cut all the way through the auxiliary wood fence.
The saw can now be safely used to cut small pieces of stock at 90 degrees to the
table.
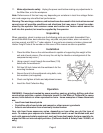
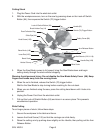
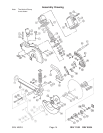
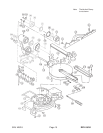
Positioning the Kerf Boards
The Kerf Boards (118 and 121), located in the Turn Base (117), are factory adjusted so that
the saw blade does not contact them when the saw blade is lowered during a cut. See the
illustration below. If the saw blade touches either Kerf Board, from any angle, adjustment is
necessary.
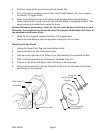
1. Unplug the Line Cord from the electrical outlet.
2. Loosen four Screws (119 and 120), front and back.
3. Loosen the Knob Screw (105) so that the saw blade carriage can move back and forth.
4. Lower the saw blade all the way down, in between the Kerf Boards, and pull the
Carriage forward.
5. Adjust the (front ends) Kerf Boards so that they almost touch the saw blade teeth.
Tighten the front Screws.
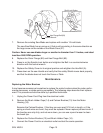
6. Push the Carriage all the way back (toward the guide Fence), and adjust the Kerf
Boards (rear) so that they almost touch the saw blade teeth. Tighten the rear Screws.
7. Loosen the Lever Rod (156) and turn the saw blade left and right for bevel cuts and
recheck the Kerf Board front and rear settings. Readjust if necessary.
8. Securely tighten all Screws.
Saw Blade
Carbide Tip
Screws (119 and 120)
Kerf Board (121)
Kerf Board (118)