


SKU 91835 Page 4
16. Do not operate tools if under the influence of alcohol or drugs. Read warning
labels on prescriptions to determine if your judgment or reflexes are impaired
while taking drugs. If there is any doubt, do not operate the tool.
17. Maintenance. For your safety, service and maintenance should be performed
regularly by a qualified technician.
18. When using tools, always read the safety warnings and instructions in the tool’s
instruction manual before using the tool.
Warning: The warnings, cautions, and instructions discussed in this instruction
manual cannot cover all possible conditions and situations that may occur. It
must be understood by the operator that common sense and caution are factors
which cannot be built into this product, but must be supplied by the operator.
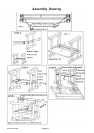
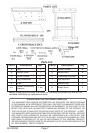
Unpacking
This product requires assembly. When unpacking, check to make sure the following
parts are included.
(1) Top (1) Lower Shelf (2) Cross Braces (2) Leg Assemblies
(1) Vise Assembly (6) 50mm Screws (8) 60mm Bolts (8) Threaded Lugs
(1) Hex Wrench (4) Wood Dogs (4) Small Anvils (1) 10mm Screw and Washer
If any parts are missing or broken, please call Harbor Freight Tools at the number on
the cover of this manual.
Assembly
1. Insert each of the 8 Threaded Lugs (H) onto the holes cross-drilled in the ends of
the Cross Braces (C) as shown in Step 1. Use the slots in the end of each Lug
to align the threads with the holes drilled into the ends of the Cross Braces.
2. Attach one Cross Brace (C) to the two Leg Assemblies (D) as shown in Step 2.
Be sure that the slotted side on the Cross Brace faces the interior of the Leg
Assemblies. Secure in place with 4 60mm Bolts (G).
3. Slide the Lower Shelf (B) into position as shown in Step 3.
4. Install the second Cross Brace (C) as shown in Step 4. Be sure the groove on
this Cross Brace also faces inward, so that the Lower Shelf (B) is held in place
by the grooves in both Cross Braces. Secure the second Cross Brace using 4
60mm Bolts (G) as before. You now have a completed “Chassis”.