


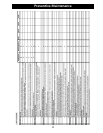

13
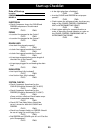
Refrigeration Charging
Refrigeration Charging
1. Install a liquid line drier in the refrigerant supply line between the service gauge and the liquid service
port of the receiver. This extra drier will insure that all refrigerant supplied to the system is clean and dry.
2. When initially charging a system that is in a vacuum, liquid refrigerant can be added directly into the
receiver tank to break the vacuum. Weighing in the charge is recommended with the initial charge
consisting of approximately 2 pounds per system compressor horsepower.
3. Remove the refrigerant drum and connect it to the suction side of the compressor to charge with
refrigerant vapor into the low side of the system until the pressure is above atmospheric.
4. Start the system and finish charging until the sight glass indicates a full charge and the proper amount
has been weighed in (a total of 4 to 5 pounds per system compressor horsepower).
5. If refrigerant must be added to the system through the suction side of the compressor, charge in vapor
form only. Liquid charging must be done in the high side only or with liquid metering devices to protect
the compressor.
Check-Out & Start-Up
After the installation has been completed, the following points should be covered before the system is
placed in operation:
(a) Check all electrical and refrigerant connections. Be sure they are all correct and tight.
(b) Check setting of time delay relay for low pressure switch in condensing unit. It should be set at two
minutes (the third marker).
(c) Check high and low pressure controls, pressure regulating valves, oil pressure safety controls, and all
other safety controls and adjust them, if necessary.
(d) Liquid line should always be insulated.
(e) Wiring diagrams, instruction bulletins, etc. attached to the condensing units should be read and filed
for future reference.
(f) All fan motors on air cooled condensers, evaporators, etc. should be checked for proper rotation. Fan
motor mounts should be carefully checked for tightness and proper alignment.
(g) Observe system pressures during charging and initial operation. Do not add oil while the system is
short of refrigerant unless oil level is dangerously low.
(h) Continue charging until system has sufficient refrigerant for proper operation. Do not overcharge.
Remember that bubbles in a sight glass may be caused by a restriction as well as a shortage of refrigerant.
(i) Do not leave unit unattended until the system has reached normal operating conditions and the oil
charge has been properly adjusted to maintain the oil level at the center of the sight glass.
CAUTION: Extreme care must be taken in starting compressors for the first time after system
charging. At this time, all of the oil and most of the refrigerant might be in the compressor
creating a condition which could cause compressor damage due to slugging. Activating the
crankcase heater for 24 hours prior to start-up is recommended. If no crankcase heater is
present, then directing a 500 watt heat lamp or other safe heat source on the lower shell of the
compressor for approximately thirty minutes will be beneficial in eliminating this condition which
might never reoccur.