


308715 13
Troubleshooting
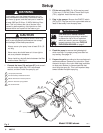
WARNING
INJECTION HAZARD
To reduce the risk of serious injury, whenever you are instructed to relieve pressure, follow the Pres-
sure Relief Procedure on page 9.
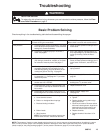
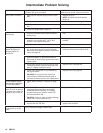
Basic Problem Solving
Check everything in the troubleshooting table before disassembling the sprayer.
TYPE OF PROBLEM WHAT TO CHECK
If check is OK, go to next check
WHAT TO DO
When check is not OK, refer to this column
Fluid pressure 1. Check pressure control knob setting. The pump
won’t develop much pressure if it is at minimum
setting (fully counterclockwise).
1. Slowly increase pressure setting to see if
motor starts.
2. Check for a clogged spray tip or fluid filter, if
used. See page 8.
2. If tip is still clogged, relieve pressure; re-
fer to separate gun or tip instruction man-
ual for tip cleaning. Clean the filter, if
used.
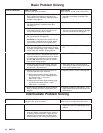
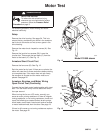
Mechanical 1. Check for frozen or hardened paint in pump
(20). Using a screwdriver, carefully try to rotate
fan at back of motor by hand. See page 17.
1. Thaw. Plug in sprayer and turn on.
Slowly increase pressure setting to see if
motor starts. If it doesn’t, see NOTE, be-
low.
2. Check pump connecting rod pin (17). It must be
completely pushed into connecting rod (15),
and retaining spring (18) must be firmly in con-
necting rod groove. See Fig. 18, page 21.
2. Push pin into place and secure with
spring retainer.
3. Check for motor damage. Remove drive hous-
ing assembly (11). See page 24. Try to rotate
motor fan by hand.
3. Replace motor (4) if fan won’t turn. See
page 22.
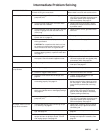
Electrical 1. Check electrical supply with volt meter. Meter
should read 105–125 VAC.
1. Reset building circuit breaker; replace
building fuse. Try another outlet.
2. Check extension cord for visible damage. Use
a volt meter or test lamp at extension cord out-
let to check.
2. Replace extension cord.
3. Check sprayer power supply cord (50) for vis-
ible damage such as broken insulation or wires.
3. Replace power supply cord.
See page 23.
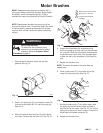
4. Check motor brushes for the following:
a. Loose terminal screws.
b. Broken or misaligned brush springs.
c. Brushes binding in holders.
d. Broken leads.
e. Worn brushes.
NOTE: The brushes do not wear at same rate
on both sides of motor. Check both brushes.
4. Refer to page 19.
a. Tighten.
b. Replace broken spring and/or align
spring with brush
c. Clean brush holders. Remove carbon
with small cleaning brush. Align brush
leads with slot in brush holder to as-
sure free vertical brush movement.
d. Replace brushes
e. Replace brushes if less than 0.5 in.
long.
NOTE: Thaw sprayer if water or water–based paint has frozen in it, due to exposure to low temperatures, by placing in a warm
area. Do not try to start sprayer until completely thawed or damage to motor and/or start board may occur. If paint hardened
(dried) in sprayer, the pump packings (page 21) and/or pressure transducer (page 27) must be replaced.