


— — 17
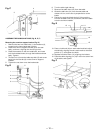
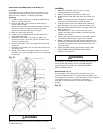
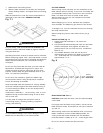
Support bearing (Fig. R)
6. Loosen the bearing hex socket screw (7) with the hex
wrench.
7. Move the blade support bearing shaft (8) in or out
until the support beating (9) is 1/64 " behind the saw
blade.
8. Tighten the beating hex socket screw.
Fig. R
7
9
8
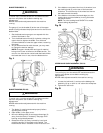
Pulley alignment (Fig. S)
The pulley alignment is adjusted properly at the factory
and should not need readjustment.
If adjustment is needed , or the belt needs replacing:
1. Place a straight edge in the front groove of both
pulleys, behind the blade wheel.
2. Turn the hex socket screw (1) in the side of the motor
pulley (2) to loosen the pulley on the shaft.
3. Adjust the motor pulley in or out on the motor shaft
(3) to align the edges of the two pulleys.
4. When aligned, tighten the hex socket screw on the
side of the motor pulley.
Fig. S
23
1
3
MOTOR
1
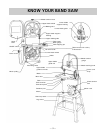
OPERATION
BASIC SAW OPERATIONS
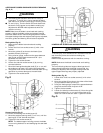
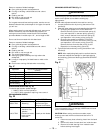
ON / OFF SWITCH (Fig. T)
The keyed switch is intended to prevent unauthorized use
of the band saw.
1. To turn the band saw ON insert the yellow key (1) into
the key slot in the center of the switch.
2. Push the key firmly into the slot, then push switch to
the ON position to start the band saw.
3. To turn the band saw OFF push the switch to the
down position.
4. Remove the yellow switch key, when the saw has
come to a complete stop, by gently pulling it outward.
WARNING
Remove the switch key whenever the saw is not in use.
Place it in a safe place and out of reach of children.
Fig. T
1
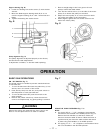
USING THE TABLE EXTENSION (Fig. T-1)
NOTE:
A. For ripping 5-3/4"~ 7-1/2" workpiece, the extension
fence has to be installed in the IN-RIP position (Fig. P).
Remove the lock handles (1) and fence. Place the
fence on extension table as shown. Raise the fence to
a position that just clears the table surface and secure
in place using lock handles (1) for IN-RIP position.
B. For ripping 7-1/2 "~ 12" workpiece, the extension fence
has to be installed in the OUT-RIP position.