


English
9
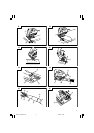
When cutting stainless steel plates, adjust the unit as
described below:
1. Adjust the speed
NOTE:
Dial scale reading is for reference only. The higher
the speed is, the quicker the material is cut. But the
service life of the blade will be reduced in this case.
When the speed is too low, cutting will take longer,
although the service life will be prolonged. Make
adjustments as desired.
2. Set the orbital position to “0”
NOTE:
⅜ When cutting use cutting fluid (oil base cutting fluid)
to prolong the blade’s service life.
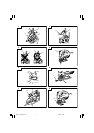
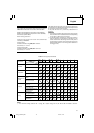
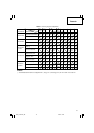
SELECTION OF BLADES
⅜ Accessory blades
To ensure maximum operating efficiency and results,
it is very important to select the appropriate blade
best suited to the type and thickness of the material
to be cut. Three types of blades are provided as
standard accessories. The blade number is engraved
in the vicinity of the mounting portion of each blade.
Select appropriate blades by referring to Table 1.
HOUSING THE HEXAGONAL BAR WRENCH
It is possible to house the hexagonal bar wrench on the
base. (See Fig. 16)
MAINTENANCE AND INSPECTION
1. Inspecting the blade
Continued use of a dull or damaged blade will result
in reduced cutting efficiency and may cause
overloading of the motor. Replace the blade with a
new one as soon as excessive abrasion is noted.
2. Inspecting the mounting screws
Regularly inspect all mounting screws and ensure that
they are properly tightened. Should any of the screws
be loose, retighten them immediately. Failure to do
so could result in serious hazard.
3. Maintenance of the motor
The motor unit winding is the very “heart” of the
power tool.
Exercise due care to ensure the winding does not
become damaged and/or wet with oil or water.
4. Inspecting the carbon brushes
For your continued safety and electrical shock
protection, carbon brush inspection and replacement
on this tool should ONLY be performed by a HITACHI
AUTHORIZED SERVICE CENTER.
5. Replacing supply cord
If the supply cord of Tool is damaged, the Tool must
be returned to Hitachi Authorized Service Center for
the cord to be replaced.
6. Service parts list
CAUTION
Repair, modification and inspection of Hitachi Power
Tools must be carried out by an Hitachi Authorized
Service Center.
This Parts List will be helpful if presented with the
tool to the Hitachi Authorized Service Center when
requesting repair or other maintenance.
In the operation and maintenance of power tools, the
safety regulations and standards prescribed in each
country must be observed.
MODIFICATIONS
Hitachi Power Tools are constantly being improved
and modified to incorporate the latest technological
advancements.
Accordingly, some parts may be changed without
prior notice.
GUARANTEE
We guarantee Hitachi Power Tools in accordance with
statutory/country specific regulation. This guarantee does
not cover defects or damage due to misuse, abuse, or
normal wear and tear. In case of complaint, please send
the Power Tool, undismantled, with the GUARANTEE
CERTIFICATE found at the end of this Handling
instruction, to a Hitachi Authorized Service Center.
NOTE:
Due to HITACHI’s continuing program of research and
development, the specifications herein are subject to
change without prior notice.
IMPORTANT:
Correct connection of the plug
The wires of the main lead and coloured in accordance
with the following code:
Blue: -Neutral
Brown: -Live
As the colours of the wires in the main lead of this tool
may not correspond with the coloured markings
identifying the terminals in your plug proceed as follows:
The wire coloured blue must be connected to the terminal
marked with the letter N or coloured black.
The wire coloured brown must be connected to the
terminal marked with the letter L or coloured red.
Neither core must be connected to the earth terminal.
NOTE:
This requirement is provided according to BRITISH
STANDARD 2769: 1984.
Therefore, the letter code and colour code may not be
applicable to other markets except The United Kingdom.
Blade
Thickness of material
Dial Scale
No. 97 1.5 – 2.5 mm
Middle groove position
between scales “2”
and “3”
01Eng_CJ90VST_WE 3/18/10, 22:599